
Spring
一.IOC(控制反转)
- 一个管理和存放bean实例的容器
- 通过xml配置文件或注解的方式自动创建bean实例
- 程序员需要使用到bean实例时,就从ioc容器中获取
ioc的简单模拟
- beans.xml配置文件
<?xml version="1.0" encoding="UTF-8"?>
<beans xmlns="http://www.springframework.org/schema/beans"
       xmlns:xsi="http://www.w3.org/2001/XMLSchema-instance"
       xsi:schemaLocation="http://www.springframework.org/schema/beans http://www.springframework.org/schema/beans/spring-beans.xsd">
        <!--在beans标签里配置java的bean实体类-->

    <bean id="car01" class="com.hsp.spring.beans.Car">
        <!--设置bean对象的属性-->
        <property name="id" value="01"></property>
        <property name="name" value="宝马"></property>
        <property name="price" value="100"></property>
    </bean>
</beans>
- 代码部分
//创建ioc容器
ClassPathXmlApplicationContext ioc = new ClassPathXmlApplicationContext("beans.xml");
//通过配置的id获取bean
Car car01 = ioc.getBean("car01", Car.class);
System.out.println(car01);
- 结果

通过id获取ioc容器中bean实例
- xml配置
<bean class="com.hsp.spring.beans.Monster" id="monster01">
        <!--在bean标签配置具体的实体类-->
        <!--bean标签的class属性表示类的全路径-->
        <!--id属性表示通过容器获取该对象时使用的id-->
        <!--property标签配置实体类的默认属性值,标签的name属性表示实体类的属性名称,value属性表示给实体类属性设置的值-->
        <property name="age" value="10"></property>
        <property name="id" value="1"></property>
        <property name="name" value="牛魔王"></property>
    </bean>
- java代码
//创建一个IOC对象,参数传入容器xml配置文件的路径
ClassPathXmlApplicationContext ioc = new ClassPathXmlApplicationContext("beans.xml");

//获取容器配置的bean对象
//通过配置的id获取
Object monster01 = ioc.getBean("monster01");
System.out.println("通过id获取的bean对象" + monster01);
//通过id和class类对象获取
Monster monster011 = ioc.getBean("monster01", Monster.class);
System.out.println("通过id+class对象获取bean对象=" + monster011);
String[] beanDefinitionNames = ioc.getBeanDefinitionNames();
for (String beanDefinitionName : beanDefinitionNames) {
    System.out.println(beanDefinitionName);
}
- 结果

通过class类对象获取ioc容器中的bean对象
- xml配置
 <bean id="car01" class="com.hsp.spring.beans.Car">
        <property name="id" value="01"></property>
        <property name="name" value="宝马"></property>
        <property name="price" value="100"></property>
    </bean>
- java代码
//创建ioc容器
ClassPathXmlApplicationContext ioc = new ClassPathXmlApplicationContext("beans.xml");
//获取bean
Car car01 = ioc.getBean("car01", Car.class);
System.out.println(car01);
- 结果

通过指定bean的构造器获取bean实例
- xml配置
 <bean id="monster02" class="com.hsp.spring.beans.Monster">
        <!--配置实例化时使用的构造器-->
        <!--index表示构造器参数的索引,通过参数的索引给构造器传参-->
        <constructor-arg index="0" value="02"></constructor-arg>
        <constructor-arg index="1" value="牛啊"></constructor-arg>
        <constructor-arg index="2" value="200"></constructor-arg>
    </bean>
    <bean id="monster03" class="com.hsp.spring.beans.Monster">
        <!--配置实例化时使用的构造器-->
        <!--name表示构造器参数的名称,通过参数的名称给构造器传参-->
        <constructor-arg name="id" value="03"></constructor-arg>
        <constructor-arg name="name" value="牛啊吖吖"></constructor-arg>
        <constructor-arg name="age" value="20"></constructor-arg>
    </bean>
    <bean id="monster04" class="com.hsp.spring.beans.Monster">
        <!--配置实例化时使用的构造器-->
        <!--type表示构造器参数的数据类型,通过参数的数据类型给构造器传参-->
        <!--通过配置的type循序找到指定构造器然后传参-->
        <constructor-arg type="java.lang.Integer" value="04"></constructor-arg>
        <constructor-arg type="java.lang.String" value="牛啊"></constructor-arg>
        <constructor-arg type="java.lang.Integer" value="200"></constructor-arg>
    </bean>
- java代码
//通过指定构造器获取bean对象,不同点在于配置文件的配置不同
ClassPathXmlApplicationContext ioc = new ClassPathXmlApplicationContext("beans.xml");
//通过索引给构造器传参,创建bean对象
Monster monster02 = ioc.getBean("monster02", Monster.class);
System.out.println(monster02);
//通过参数名给构造器传参,创建对象
Monster monster03 = ioc.getBean("monster03", Monster.class);
System.out.println(monster03);
//通过构造器的参数数据类型创建bean对象
Monster monster04 = ioc.getBean("monster04", Monster.class);
System.out.println(monster04);
- 结果

通过p名称空间设置bean实例的属性
- xml配置
- 需要在xml中引入配置文件,
xmIns:p="http://www.springframework.orq/schema/p"
<!--
需要在头文件中引入使用p名称空间的文件
xmIns:p="http://www.springframework.orq/schema/p"-->
<bean id="monster05" class="com.hsp.spring.beans.Monster"
          p:age="10" p:id="05" p:name="牛逼">
        <!--通过p名称空间给bean实例设置属性-->
    </bean>
- java代码
//获取通过p名称空间配置的bean实例
ClassPathXmlApplicationContext ioc = new ClassPathXmlApplicationContext("beans.xml");
Car car01 = ioc.getBean("car01", Car.class);
System.out.println(car01);
- 结果

通过ref引入或注入其他bean实例
- 在spring的ioc容器,可以通过ref来实现bean对象的相互引用
- xml配置
<!--通过ref引入或注入其他bean实例-->
    <bean class="com.hsp.spring.beans.MemberDao" id="memberDao"></bean>
    <bean class="com.hsp.spring.beans.MemberService" id="memberService">
        <!--使用ref属性引入memberDao实例-->
        <property name="memberDao" ref="memberDao"/>
    </bean>
- java代码
//通过ref引入或注入其他bean实例
ClassPathXmlApplicationContext ioc = new ClassPathXmlApplicationContext("beans.xml");
MemberService memberService = ioc.getBean("memberService", MemberService.class);
memberService.add();
- 结果

通过property在内部引入或注入其他bean实例
- xml配置
  <!--在内部引入或注入bean实例-->
    <bean class="com.hsp.spring.beans.MemberService" id="memberService2">
        <!--在property中引入其他的bean实例-->
        <property name="memberDao">
            <bean class="com.hsp.spring.beans.MemberDao"></bean>
        </property>
    </bean>
- java代码
//通过property在内部引入或注入其他bean实例
ClassPathXmlApplicationContext ioc = new ClassPathXmlApplicationContext("beans.xml");
MemberService memberService2 = ioc.getBean("memberService2", MemberService.class);
memberService2.add();
- 结果

引入或注入集合和数组
- xml配置
 <!--引入或注入集合和数组类型-->
    <bean class="com.hsp.spring.beans.Master" id="master">
        <property name="name" value="太上老君"></property>
        <!--配置List集合-->
        <property name="monsterList">
            <!--配置List集合需要在property标签中的list标签配置-->
            <list>
                <!--使用ref引入bean-->
                <ref bean="monster01"></ref>
                <!--直接配置bean-->
                <bean class="com.hsp.spring.beans.Monster">
                    <property name="name" value="妖怪"/>
                    <property name="id" value="001"/>
                    <property name="age" value="10"/>
                </bean>
            </list>
        </property>
        <!--配置Map集合-->
        <property name="monsterMap">
            <!--在map标签中entry标签配置每一对k-v-->
            <!--value标签中配置的是字符串-->
            <map>
                <entry>
                    <key>
                        <value>monster03</value>
                    </key>
                    <ref bean="monster03"></ref>
                </entry>
                <entry>
                    <key>
                        <value>04</value>
                    </key>
                    <ref bean="monster04"></ref>
                </entry>
            </map>
        </property>
        <!--配置数组-->
        <property name="monsterName">
            <!--在array标签中配置-->
            <array>
                <value>小鬼</value>
                <value>大鬼</value>
                <value>老鬼</value>
            </array>
        </property>
        <!--配置Set集合-->
        <property name="monsterSet">
            <set>
                <ref bean="monster05"></ref>
                <bean class="com.hsp.spring.beans.Monster">
                    <property name="id" value="003"/>
                    <property name="name" value="妖怪"/>
                    <property name="age" value="20"/>
                </bean>
            </set>
        </property>
        <!--配置Properties-->
        <property name="pros">
            <!--在pros标签中的prop标签中配置-->
            <props>
                <prop key="username">yangyi</prop>
                <prop key="ip">127.0.0.2</prop>
                <prop key="password">1234</prop>
            </props>
        </property>
    </bean>
- java代码
//引用或注入集合或数组类型的属性
ClassPathXmlApplicationContext ioc = new ClassPathXmlApplicationContext("beans.xml");
Master master = ioc.getBean("master", Master.class);
System.out.println(master);
- 结果

通过util:list名称空间配置bena实例
- util名称空间也可以应用到其他集合或数组上
- 一般会将实例共有的数据放到util名称空间中
- 使用util名称空间需要引入
xmlns:util="http://www.springframework.org/schema/util" - xml配置
<!--通过util:list名称空间引入或注入List集合-->
    <!--创建一个util:list名称空间-->
    <util:list id="myBookStore">
        <value>三国演义</value>
        <value>西游记</value>
        <value>红楼梦</value>
        <value>水浒传</value>
    </util:list>
    <bean class="com.hsp.spring.beans.BookStore" id="bookStore">
        <!--引入util:list名称空间的配置-->
        <property name="bookName" ref="myBookStore"/>
    </bean>
- java代码
//通过util:list名称空间配置
ClassPathXmlApplicationContext ioc = new ClassPathXmlApplicationContext("beans.xml");
BookStore bookStore = ioc.getBean("bookStore", BookStore.class);
System.out.println(bookStore);
- 结果

给级联属性赋值
- 就是给属性的属性赋值
- xml配置
 <!--通过给级联属性赋值,给属性的属性赋值-->
    <bean class="com.hsp.spring.beans.Dept" id="dept"></bean>
    <bean class="com.hsp.spring.beans.Empl" id="empl">
        <property name="name" value="jack"/>
        <property name="dept" ref="dept"/>
        <property name="dept.name" value="java开发部"/>
    </bean>
- java代码
//通过级联属性赋值
ClassPathXmlApplicationContext ioc = new ClassPathXmlApplicationContext("beans.xml");
Empl empl = ioc.getBean("empl", Empl.class);
System.out.println(empl);
- 结果

通过静态工厂获取bean实例
- factory静态工厂类
 private static Map<String, Monster> monsterMap;

    //通过静态代码快对静态工厂进行初始化
    static {
        monsterMap = new HashMap<>();
        monsterMap.put("monster01",new Monster(01,"jack",23));
        monsterMap.put("monster02",new Monster(02,"tom",24));
    }

    public MyStaticFactory() {
    }

    public static Monster getMonster(String key){
        return monsterMap.get(key);
    }
    public Map<String, Monster> getMonsterMap() {
        return monsterMap;
    }
	//获取bean实例的方法
    public void setMonsterMap(Map<String, Monster> monsterMap) {
        this.monsterMap = monsterMap;
    }
- xml配置
- 通过静态工厂获取bean实例,需要指定标签的factory-method属性
- factory-method属性表示调用该静态工厂的哪个方法获取备案实例
- 通过constructor-arg标签指定调用方法的参数
- 从不同的静态工厂获取同一个bean实例,它们是同一个bean实例,而从不同实例工厂获取的同一个(参数相同)bean实例不是同一个
 <!--通过静态工厂获得bean实例-->
    <bean class="com.hsp.spring.factory.MyStaticFactory" id="factory" factory-method="getMonster">
        <!--通过静态工厂获取bean实例,需要指定标签的factory-method属性-->
        <!--factory-method属性表示调用该静态工厂的哪个方法获取备案实例-->
        <!--通过constructor-arg标签指定调用方法的参数-->
        <constructor-arg value="monster01"></constructor-arg>
    </bean>
- java代码
- 最后返回的是factory工厂配置的bean实例,不是factory工厂实例
ClassPathXmlApplicationContext ioc = new ClassPathXmlApplicationContext("beans.xml");
//从ioc中获取factory工厂实例,然后调用factory工厂获取bean实例的方法,
// 最后返回的是factory工厂配置的bean实例,不是factory工厂实例
Monster factory = ioc.getBean("factory", Monster.class);
System.out.println(factory);
- 结果

通过实例工厂获取bean实例
- factory实例工厂类
private Map<String, Monster> monsterMap;
    //实例工厂通过代码块进行初始化
    {
        monsterMap = new HashMap<>();
        monsterMap.put("monster03",new Monster(03,"yangyi",22));
        monsterMap.put("monster04",new Monster(04,"kl",33));
    }

    public MyInstanceFactory() {
    }

    public MyInstanceFactory(Map<String, Monster> monsterMap) {
        this.monsterMap = monsterMap;
    }

    //实例工厂返回实例的方法
    public Monster getMonster(String key){
        return monsterMap.get(key);
    }
- xml配置
- 需要先配置实例工厂,然后再配置从实例工厂中获取的bean实例
- 配置获取的bean实例,还需要指定从哪个实例工厂中获取
- 不同的实例工厂获取的bean实例,不是同一个,即是属性值一样,它们的哈希值是不一样的
 <!--通过实例工厂获取bean实例-->
    <!--先配置一个实例工厂-->
    <bean class="com.hsp.spring.factory.MyInstanceFactory" id="factory2" ></bean>
    <!--配置从实例工厂获取的bean-->
    <!--factory-bean表示实例工厂的实例,factory-method表示实例工厂调用的方法-->
    <bean factory-bean="factory2" id="instanceBean" factory-method="getMonster">
        <!--constructor-arg表示实例工厂调用方法传进去的参数-->
        <constructor-arg value="monster03"></constructor-arg>
    </bean>
- java代码
//通过实例工厂获取bean对象
ClassPathXmlApplicationContext ioc = new ClassPathXmlApplicationContext("beans.xml");
Monster instanceBean = ioc.getBean("instanceBean", Monster.class);
System.out.println(instanceBean);
- 结果

通过FactoryBean获取bean实例
- factoryBean实例工厂类
- 实现FactoryBean接口
public class MyFactoryBean implements FactoryBean<Monster> {
    private String key;
    private Map<String,Monster> monster_Map;
    {
        //初始化
        monster_Map = new HashMap<>();
        monster_Map.put("monster05",new Monster(05,"yangyi",43));
        monster_Map.put("monster06",new Monster(06,"咳咳",221));
    }

    public void setKey(String key) {
        this.key = key;
    }

    @Override
    public Monster getObject() throws Exception {
        return monster_Map.get(key);
    }

    @Override
    public Class<?> getObjectType() {
        return Monster.class;
    }

    @Override
    public boolean isSingleton() {//这里设置是否是单例的
        return FactoryBean.super.isSingleton();
    }
}
- xml配置
<!--通过factoryBean获取bean实例-->
    <bean class="com.hsp.spring.factory.MyFactoryBean" id="factoryBean">
        <!--通过设置factoryBean的key属性,取出相应的bean实例-->
        <property name="key" value="monster05"/>
    </bean>
- java代码
//通过factoryBean获取bean实例
ClassPathXmlApplicationContext ioc = new ClassPathXmlApplicationContext("beans.xml");
Monster factoryBean = ioc.getBean("factoryBean", Monster.class);
System.out.println(factoryBean);
- 结果

通过类似继承的方式配置bean
- xml配置
- 通过parent属性指定继承的bean实例
- 通过abstract属性指定一个bean为抽象的bean,专门用于继承
- 通过继承可以使用bean实例与父类的bean具有一样的属性值
 <!--bean属性的继承-->
    <bean class="com.hsp.spring.beans.Monster" id="monster001">
        <property name="id" value="001"/>
        <property name="name" value="jack"/>
        <property name="age" value="100"/>
    </bean>
    <bean  class="com.hsp.spring.beans.Monster" id="monster0001" abstract="true">
        <!--通过abstract设置bean为抽象bean,不能被实例化,专门用于继承-->
        <property name="age" value="100"/>
        <property name="name" value="jack"/>
        <property name="id" value="001"/>
    </bean>
    <!--通过parent继承配置一样的属性-->
    <bean class="com.hsp.spring.beans.Monster" parent="monster001" id="monster002"></bean>
- java代码
//通过继承获取bean
ClassPathXmlApplicationContext ioc = new ClassPathXmlApplicationContext("beans.xml");
Monster monster002 = ioc.getBean("monster002", Monster.class);
System.out.println(monster002);
- 结果

bean实例的创建顺序
- 默认是按配置的顺序创建
- 如果有配置
depends-on属性,则按照相应的依赖关系创建 - 如下,则会先实例化
test02再实例化test01
<bean class="com.hsp.spring.beans.Monster" id="test01"/>
<bean class="com.hsp.spring.beans.Monster" id="test02" depends-on="test01"/>
bean实例的单例和非单例,bean的懒加载
-
单例就是只能有一个该类的实例,非单例则可以有多个实例
-
懒加载表示,在需要该实例时才会创建,即调用getBean()方法时才会创建,非懒加载表示,在程序启动时就自动实例响应的类
-
非单例无论是不是懒加载,都是在需要使用的时候才会实例化
-
xml配置
<!-- 1.配置bean实例是单例还是多例的,通过scope属性配置,singleton表示单例,prototype表示非单例的,默认是单例的 2.配置懒加载,通过lazy-init属性配置,默认是懒加载 3.当一个bean是单例且是懒加载时,在getBean的时候才会创建bean实例 4.当一个bean是非单例时,无论是不是懒加载,都是在getBean时才创建bean实例 --> <!--单例,懒加载--> <bean class="com.hsp.spring.beans.Car" id="car001" scope="singleton" lazy-init="true"/> <!--非单例--> <bean class="com.hsp.spring.beans.Car" id="car002" scope="prototype"/> -
java代码
//bean实例是单例还是非单例
ClassPathXmlApplicationContext ioc = new ClassPathXmlApplicationContext("beans.xml");
Car car001 = ioc.getBean("car001", Car.class);
Car car002 = ioc.getBean("car001", Car.class);
Car car003 = ioc.getBean("car002", Car.class);
Car car004 = ioc.getBean("car002", Car.class);
//判断是否是同一个对象
System.out.println("car001与car002是否是同一个对象:"+car001.equals(car002));
System.out.println("car003与car004是否是同一个对象:"+car003.equals(car004));
- 结果

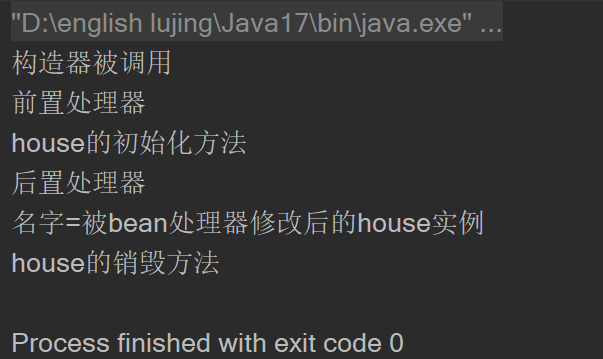
bean的生命周期
- 首先bean实例由JVM虚拟机创建,然后
- 调用构造器
- 凋用setter方法
- 调用初始化方法(由程序员指定)
- bean实例的使用
- bean实例的销毁(会调用程序员指定的销毁方法)
- 容器关闭或销毁时,调用destroy方法
- House类
private String name;

    /**
     * 初始化方法和销毁方法,是由程序员决定的,取决于具体的业务逻辑
     * 需要配置在xml中
     * 首先bean实例由JVM虚拟机创建,然后
     * 1.调用构造器
     * 2.调用setter方法
     * 3.调用初始化方法(由程序员指定)
     * 4.bean实例的使用
     * 5.bean实例的销毁(会调用程序员指定的销毁方法)
     */
    public void init(){
        System.out.println("house的初始化方法");
    }

    //容器关闭或销毁时,调用destroy方法
    public void destroy(){
        System.out.println("house的销毁方法");
    }

    public House() {
        System.out.println("构造器被调用");
    }

    public House(String name) {
        this.name = name;
    }

    public String getName() {
        return name;
    }

    public void setName(String name) {
        this.name = name;
    }
- xml配置
 <!--
        配置bean的初始化方法和销毁方法
        通过配置init-method属性配置初始化方法
        通过配置destroy-method属性配置销毁方法
    -->
    <bean class="com.hsp.spring.beans.House" id="house" init-method="init" destroy-method="destroy">
        <property name="name" value="碧桂园"/>
    </bean>
- java代码
//bean的生命周期
//获取ioc容器
ClassPathXmlApplicationContext ioc = new ClassPathXmlApplicationContext("beans.xml");

//获取bean实例
House house = ioc.getBean("house", House.class);
//bean实例化时会调用构造器和setter方法和init初始化方法

//使用bean实例
System.out.println(house.getName());

//关闭ioc容器,销毁bean实例,会调用bean实例的destroy方法
((ClassPathXmlApplicationContext)ioc).close();
- 结果

bean的处理器
- bean的后置处理器本质是一个对象
- 在每个bena调用init()初始化方法的前和后都会使用
- 对同一个ioc容器的所有bean都有效
- bean的后置处理器需要实现``BeanPostProcessor接口,重写
postProcessBeforeInitialization和postProcessAfterInitialization两个方法 postProcessBeforeInitialization方法会在调用bean的初始化方法前被调用postProcessAfterInitialization方法会在调用bena的初始化方法后被调用- 通过bean后置处理器实现对同一个ioc容器bean实例的统一处理,如:日志处理,权限校验
- bean的处理器对象
package com.hsp.spring.beans;

import org.springframework.beans.BeansException;
import org.springframework.beans.factory.config.BeanPostProcessor;

/**
 * @Projectname: spring
 * @Filename: MyBeanPostProcess
 * @Author: 杨逸
 * @Data:2023/5/31 9:08
 * @Description: TODO
 */
public class MyBeanPostProcess implements BeanPostProcessor {
    /**
     *
     * @param bean 准备调用初始化方法的bean
     * @param beanName bean的id
     * @return 返回处理后的bean
     * @throws BeansException
     */
    @Override
    public Object postProcessBeforeInitialization(Object bean, String beanName) throws BeansException {
        System.out.println("前置处理器");
        if(bean instanceof House){
            ((House)bean).setName("被bean处理器修改后的house实例");
        }
        return bean;
    }

    @Override
    public Object postProcessAfterInitialization(Object bean, String beanName) throws BeansException {
        System.out.println("后置处理器");
        return bean;
    }
}
- xml配置
 <!--配置bean-->
    <bean class="com.hsp.spring.beans.House" id="house" init-method="init" destroy-method="destroy">
        <property name="name" value="大房子"/>
    </bean>
    <!--配置后置处理器-->
    <bean class="com.hsp.spring.beans.MyBeanPostProcess" id="beanPostProcess"></bean>
- java代码
//bean的处理器
    @Test
    void testBeanPostProcess(){
        ClassPathXmlApplicationContext ioc = new ClassPathXmlApplicationContext("beans02.xml");
        House house = ioc.getBean("house", House.class);//在调用bean实例初始化方法的前后调用bean的处理器方法
        System.out.println("名字=" + house.getName());
        ioc.close();
    }
}
- 结果
通过文件引入或注入属性
- 需要通过
xmlns:context="http://www.springframework.org/schema/context名称空间引入配置文件 properties文件的编码是unicode编码,有中文时需要将中文转换成unicode编码- peoperties配置
monster_name=jack
monster_id=001
monster_age=100
- xml配置
- 文件属性引用时,使用美元符号+大括号:
${}
<!--
    引入配置文件
    注意:在properties配置文件前要写上classpath:
    -->
    <context:property-placeholder location="classpath:my.properties"/>

    <!--使用配置文件的内容配置bean实例-->
    <bean class="com.hsp.spring.beans.Monster" id="monster">
        <property name="name" value="${monster_name}"/>
        <property name="id" value="${monster_id}"/>
        <property name="age" value="${monster_age}"/>
    </bean>
- java代码
 //通过properties文件配置bean实例
    @Test
    void setProByProFile(){
        ClassPathXmlApplicationContext ioc = new ClassPathXmlApplicationContext("beans03.xml");
        Monster monster = ioc.getBean("monster", Monster.class);
        System.out.println(monster);
    }
- 结果

bean的自动装载
- 通过
autowire属性给bean实例的属性自动装载,autowire的值有四种byName,byType,byConstructor,by byName:找到对应id的bean实例给bean的属性装载bytype:通过找到对应类型的bean实例给bean属性装载- xml配置
<!--autowire值的解读
    byName的解读
    1.找对应属性的setxx()方法
    2.根据setxx方法的xx,在ioc容器中寻找id与xx一致的bean实例,然后装载
    3.如果没有就设置为null
    byType的解读
    1.通过bean属性的类型,在ioc容器中查找类型一致的bean实例,该bean实例只能有一个
    2.如果找到就装载到bean实例的属性中
    -->
    <!--配置dao实例-->
    <bean class="com.hsp.dao.MemberDao" id="memberDao">
        <property name="name" value="会员"/>
    </bean>
    <!--
    配置service实例,使用autowire自动装载
    在ioc容器中查找与setMemberDao()方法的memberDao一致id的bean实例装载到memberService的memberDao属性中
    -->
    <bean class="com.hsp.service.MemberService" id="memberService" autowire="byName"/>
    <!--
    配置servlet实例,使用autowire自动装载
    1.在ioc容器中查找与memberServlet属性memberService类型一致的备案实例
    2.然后装载到memberService属性中
    -->
    <bean class="com.hsp.servlet.MemberServlet" id="memberServlet" autowire="byType"/>
- java代码
//通过autowire实现bean实例的自动装载
ClassPathXmlApplicationContext ioc = new ClassPathXmlApplicationContext("beans03.xml");
MemberServlet memberServlet = ioc.getBean("memberServlet", MemberServlet.class);
//输入检验memberService是否自动装载成功
System.out.println(memberServlet.getMemberService());
//输入检验memberDao是否自动装载成功
System.out.println(memberServlet.getMemberService().getMemberDao());
- 结果

spring El表达式
-
Spring Expression Language,Spring表达式语言,简称SpEL。支持运行时查询并可以操作对象。
-
和EL表达式一样,SpEL根据JavaBean风格的getXxx()、setXxx()方法定义的属性访问对象
-
SpEL使用
#{...}作为定界符,所有在大框号中的字符都将被认为是SpEL表达式。 -
类似jsp的el表达式,
spring el表达式的使用方法井号+大括号#{} -
spring el表达式使用在ioc容器的xml配置文件中 -
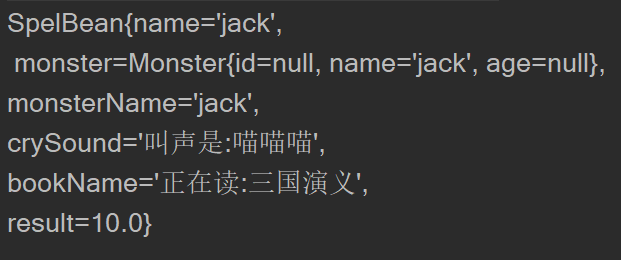
SpelBean
{
    private String name;
    private Monster monster;
    private String monsterName;
    private String crySound;
    private String bookName;
    private Double result;

    public static String read(String bookName){
        return "正在读:"+bookName;
    }
    public String cry(String crySound){
        return "叫声是:" + crySound;
    }
    public String getName() {
        return name;
    }

    public void setName(String name) {
        this.name = name;
    }

    public Monster getMonster() {
        return monster;
    }

    public void setMonster(Monster monster) {
        this.monster = monster;
    }

    public String getMonsterName() {
        return monsterName;
    }

    public void setMonsterName(String monsterName) {
        this.monsterName = monsterName;
    }

    public String getCrySound() {
        return crySound;
    }

    public void setCrySound(String crySound) {
        this.crySound = crySound;
    }

    public String getBookName() {
        return bookName;
    }

    public void setBookName(String bookName) {
        this.bookName = bookName;
    }

    public Double getResult() {
        return result;
    }

    public void setResult(Double result) {
        this.result = result;
    }

    @Override
    public String toString() {
        return "SpelBean{" +
                "name='" + name + '\'' +
                ",\n monster=" + monster +
                ", \nmonsterName='" + monsterName + '\'' +
                ", \ncrySound='" + crySound + '\'' +
                ", \nbookName='" + bookName + '\'' +
                ", \nresult=" + result +
                '}';
    }
}
- xml配置
<bean class="com.hsp.spring.beans.Monster" id="monster">
        <property name="name" value="jack"/>
    </bean>

    <bean class="com.hsp.spring.beans.SpelBean" id="spelBean">
        <!--给String类型赋值-->
        <property name="name" value="#{'jack'}"/>
        <!--调用静态方法的返回值赋值,在T()里写上类的全类名-->
        <property name="bookName" value="#{T(com.hsp.spring.beans.SpelBean).read('三国演义')}"/>
        <!--调用bean实例的普通方法给属性赋值-->
        <property name="crySound" value="#{spelBean.cry('喵喵喵')}"/>
        <!--直接引用其他bean实例给属性赋值-->
        <property name="monster" value="#{monster}"/>
        <!--使用其他bean实例的属性给属性赋值-->
        <property name="monsterName" value="#{monster.name}"/>
        <!--直接使用运算表达式给属性赋值-->
        <property name="result" value="#{2*5}"/>
    </bean>
- java代码
//通过Sp el表达式给bean实例赋值
ClassPathXmlApplicationContext ioc = new ClassPathXmlApplicationContext("beans04.xml");
SpelBean spelBean = ioc.getBean("spelBean", SpelBean.class);
System.out.println(spelBean);
- 结果
使用注解配置bean实例
-
使用注解配置bean需要使用到
spring-aop-5.3.8.jar包 -
基于注解的方式配置bean,主要是项目开发中的组件,比如Controller、Service、和Dao,组件注解的形式有:
@Component表示当前注解标识的是一个组件@Controller表示当前注解标识的是一个控制器,通常用于Servlet@Service表示当前注解标识的是一个处理业务逻辑的类,通常用于Service类@Repository表示当前注解标识的是一个持久化层的类,通常用于Dao类
-
通过给注解的value设置值,设置bean的id,
-
如果没有给value设置值,默认将类名第一个字母小写,然后作为bean的id
-
配置文件需要使用
context:component名称空间,配置ioc容器初始化主动扫描的包base-package指明ioc初始化时要扫描的包,是递归扫描,子包也会被扫描- 默认是所有被组件注解标识的类都会被创建bean实例
- 使用
context:exclude-filter名称空间,可以指定忽略不被扫描的类 - 使用
context:include-filter名称空间,可以指定扫描的类,需要取消默认扫描方式,将use-default-filters设置为false
-
bean
MyComponent类
/**
 * @Projectname: spring
 * @Filename: MyComponent
 * @Author: 杨逸
 * @Data:2023/6/1 16:03
 * @Description: 使用注解配置bean
 */
/**
 * 使用@Component注解标识一个组件类
 * 通过给注解的value设置值,设置bean的id
 * 如果没有给value设置值,默认将类名第一个字母小写,然后作为bean的id
 */
@Component(value = "testComponent")
public class MyComponent {
}
UserDao类
//使用@Repository注解标识Dao
@Repository
public class UserDao {
}
UserService类
//使用@Service注解标识一个Service类
@Service
public class UserService {

}
UserAction类
//使用@Controller注解标识一个Servlet或Action @Controller public class UserAction { } -
xml配置
<?xml version="1.0" encoding="UTF-8"?>
<beans xmlns="http://www.springframework.org/schema/beans"
       xmlns:xsi="http://www.w3.org/2001/XMLSchema-instance"
       xmlns:context="http://www.springframework.org/schema/context"
       xsi:schemaLocation="http://www.springframework.org/schema/beans http://www.springframework.org/schema/beans/spring-beans.xsd http://www.springframework.org/schema/context https://www.springframework.org/schema/context/spring-context.xsd">

    <!--配置使用注解配置bean实例-->
    <!--引入名称空间xmlns:context="http://www.springframework.org/schema/context"-->
    <!--配置主动扫描的包-->
    <!--
    1.需要使用context:component-scan名称空间,标识要扫描的包
    2.包中的类如果被注解(@Component,@Repository,@Service,@Controller)标识,就会在ioc容器中创建相应的bean实例
    3.如果没有指定注解的value,默认bean实例的id就是类名第一个字母小写后的类名
    -->
    <!--
    1.base-package指明ioc初始化时要扫描的包,是递归扫描,子包也会被扫描
    2.默认是所有被组件注解标识的类都会被创建bean实例
    3.使用context:exclude-filter名称空间,可以指定忽略不被扫描的类
    4.使用context:include-filter名称空间,可以指定扫描的类,需要取消默认扫描方式,将use-default-filters设置为false

    -->
    <!--忽略扫描一些注解-->
    <context:component-scan base-package="com.hsp.spring.component">
        <!--
        type指定忽略的方式是注解,expression指定忽略具体注解的全类名
        -->
        <context:exclude-filter type="annotation" expression="org.springframework.stereotype.Component"/>
    </context:component-scan>
    <!--指定扫描的注解-->
    <context:component-scan base-package="com.hsp.spring.component" use-default-filters="false">
        <!--
        1.取消默认的扫描机制,use-default-filters=false
        2.type指定扫描的方式是注解,expression指定扫描的注解的全类名
        -->
        <context:include-filter type="annotation" expression="org.springframework.stereotype.Service"/>
    </context:component-scan>
</beans>
- java代码,获取注解配置bena
//通过Sp el表达式给bean实例赋值
@Test
void testSpel(){
ClassPathXmlApplicationContext ioc = new ClassPathXmlApplicationContext("beans04.xml");
SpelBean spelBean = ioc.getBean("spelBean", SpelBean.class);
System.out.println(spelBean);
}
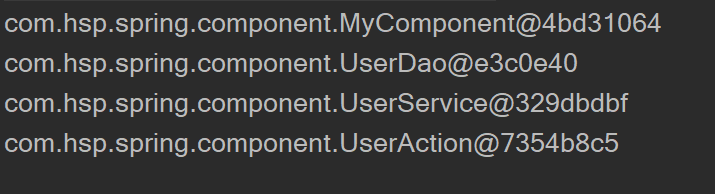
//获取通过注配置的bean
@Test
void getBeanByAnnotation(){
ClassPathXmlApplicationContext ioc = new ClassPathXmlApplicationContext("beans05.xml");
//获取指定注解value的bean
MyComponent testComponent = ioc.getBean("testComponent", MyComponent.class);
//获取使用默认id的bean
UserDao userDao = ioc.getBean("userDao", UserDao.class);
UserService userService = ioc.getBean("userService", UserService.class);
UserAction userAction = ioc.getBean("userAction", UserAction.class);
//打印对象,验证容器是否创建了对应的bean实例
System.out.println(testComponent);
System.out.println(userDao);
System.out.println(userService);
System.out.println(userAction);
}
- 结果
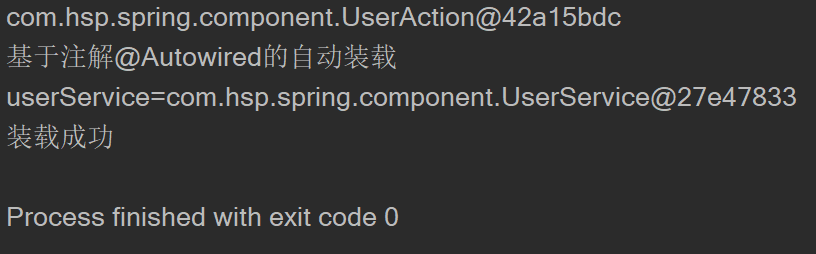
基于注解的自动装载(@Autowired和@Resource)
@autowired注解和@Resource注解都可以自动装载bean,一般情况下使用@Resource注解
@Autowired
- 首先按类型在ioc容器中查找bean,然后装载,要求bean是单例的
- 如果不是单例的,就按属性名在ioc容器中查找
- 以上情况都不满足,就抛出异常,报错
- 如何指定装载的bean?搭配
@Qualifier注解可以指定装载bean的id - 案例:在UserAction中自动装载UserService属性
- UserAction类
//使用@Controller注解标识一个Servlet或Action
@Controller(value = "userAction")
public class UserAction {
    /**
     * 1.首先按类型到ioc容器中查找,如果是单例就装载
     * 2.如果有多个,就按属性名匹配,没有匹配的就抛出异常
     */
    @Autowired
     //搭配@Qualifier注解,可以指定装载bean的id
    @Qualifier(value = "userService")
    private UserService userService;

    //测试是否装载成功
    public void sayOk(){
        System.out.println("基于注解@Autowired的自动装载");
        System.out.println("userService="+this.userService);
        System.out.println("装载成功");
    }
}
- UserService类
//使用@Service注解标识一个Service类
@Service
public class UserService {

}
- xml配置
<?xml version="1.0" encoding="UTF-8"?>
<beans xmlns="http://www.springframework.org/schema/beans"
       xmlns:xsi="http://www.w3.org/2001/XMLSchema-instance"
       xmlns:context="http://www.springframework.org/schema/context"
       xsi:schemaLocation="http://www.springframework.org/schema/beans http://www.springframework.org/schema/beans/spring-beans.xsd http://www.springframework.org/schema/context https://www.springframework.org/schema/context/spring-context.xsd">

        <!--配置要扫描的包-->
        <context:component-scan base-package="com.hsp.spring.component"/>
</beans>
- 测试
//基于注解自动装载bean
    @Test
    void setBeanByAutowired(){
        ClassPathXmlApplicationContext ioc = new ClassPathXmlApplicationContext("beans06.xml");
        UserAction userAction = ioc.getBean("userAction", UserAction.class);
        System.out.println(userAction);
        //测试基于注解的自动装载
        userAction.sayOk();
    }
- 结果
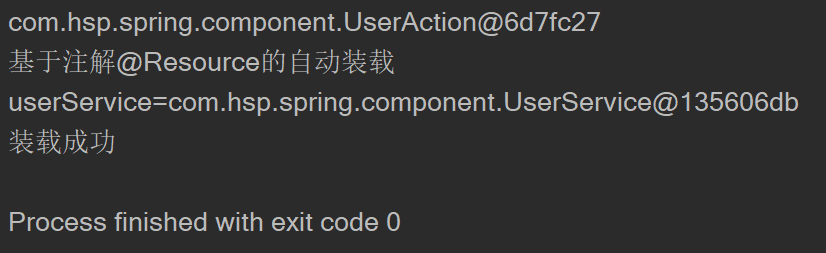
@Resource
@Resource注解有name和type属性,name属性可以指定装载bean的id,type可以指定装载bean的类型- 如果没有配置name属性和type属性,就先按照bean属性的名称到ioc容器中匹配,
- 如果没有匹配到,就再按bean属性的类型去匹配,如果都没匹配上就抛出异常
- 案例:在UserAction中自动装载UserService属性
- UserAction类
package com.hsp.spring.component;

import org.springframework.beans.factory.annotation.Autowired;
import org.springframework.beans.factory.annotation.Qualifier;
import javax.annotation.Resource;
import org.springframework.stereotype.Controller;


/**
 * @Projectname: spring
 * @Filename: UserAction
 * @Author: 杨逸
 * @Data:2023/6/1 16:11
 * @Description: TODO
 */
//使用@Controller注解标识一个Servlet或Action
@Controller(value = "userAction")
public class UserAction {
    /**
     * 1.@Resource可以指定装载bean的id和类型,通过注解的name属性和type属性
     * 2.如果没有指定注解的name属性和type属性,就先按照bean属性的名称到ioc容器中匹配
     * 3.如果没有匹配上,再按bean属性的类型去匹配,如果都没有匹配上就抛出异常
     */
    @Resource(name = "userService",type = UserService.class)
    private UserService userService;

    //测试是否装载成功
    public void sayOk(){
        System.out.println("基于注解@Resource的自动装载");
        System.out.println("userService="+this.userService);
        System.out.println("装载成功");
    }
}
- UserService类
//使用@Service注解标识一个Service类
@Service
public class UserService {

}
- xml配置
<!--配置要扫描的包-->
        <context:component-scan base-package="com.hsp.spring.component"/>
- 测试
//基于注解自动装载bean
    @Test
    void setBeanByResource(){
        ClassPathXmlApplicationContext ioc = new ClassPathXmlApplicationContext("beans06.xml");
        UserAction userAction = ioc.getBean("userAction", UserAction.class);
        System.out.println(userAction);
        //测试基于注解的自动装载
        userAction.sayOk();
    }
- 结果
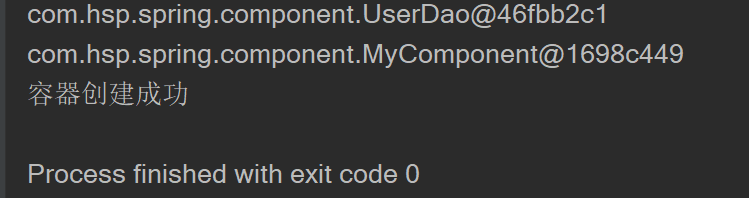
实现一个简单的ioc容器,基于注解的形式
-
自定义一个注解
MyComponent,用于设置扫描的路径,代替xml配置文件 -
定义一个配置类
ComponentConfg,使用注解MyComponent修饰,配置扫描的路径 -
定义一个ioc容器
MyApplicationContext,有一个记录配置的属性ComponentConfig,一个存放bean实例的ConcurrentHashMap集合 -
MyComponent注解
//使用元注解,指定注解的作用范时期是运行时也生效
@Retention(RetentionPolicy.RUNTIME)
//使用元注解,指定注解的作用范围是类
@Target(ElementType.TYPE)
public @interface ComponentScan {
    String value();
}
ComponentConfig配置类
//使用注解指定要扫描的包
@ComponentScan(value = "com.hsp.spring.component")
public class ComponentConfig {
}
MyApplicationContext容器
{
    //配置类
    private Class configClass;
    //ioc容器
    private final ConcurrentHashMap<String,Object> ioc = new ConcurrentHashMap<>();

    /**
     * 构造器,通过传进来的配置类初始化ioc容器
     * @param configClass
     */
    public MyApplicationContext(Class configClass){
        this.configClass = configClass;

        //通过类的加载器获取要扫描的绝对路径
        ClassLoader classLoader = this.configClass.getClassLoader();

        //获取配置的包路径
        Annotation annotation = this.configClass.getAnnotation(ComponentScan.class);
        ComponentScan componentScan = (ComponentScan) annotation;
        String packagePath = componentScan.value();

        //包名转换成路径
        packagePath = packagePath.replace(".","/");

        //获取绝对路径
        URL resource = classLoader.getResource(packagePath);

        //读取目录
        File file = new File(resource.getFile());
        if (file.isDirectory()){
            //获取目录下的class文件
            File[] files = file.listFiles();

            //路径转换成包名
            packagePath = packagePath.replace("/",".");
            for (File file1 : files) {
                //得到类的全类名,判断是否有注解修饰,实例化放到容器中
                String name = file1.getName();
                name = name.substring(0,name.indexOf(".class"));
                String fullClassName = packagePath + "." + name;

                //使用类加载器加载Class对象
                try {
                    Class<?> aClass = classLoader.loadClass(fullClassName);
                    //通过class对象判断是否被注解修饰
                    if (aClass.isAnnotationPresent(Component.class)||aClass.isAnnotationPresent(Controller.class)
                            ||aClass.isAnnotationPresent(Service.class)||aClass.isAnnotationPresent(Repository.class)){
                        //bean实例的id
                        String key = "";

                        //注解是否有传值
                        if (aClass.isAnnotationPresent(Component.class) && ! aClass.getAnnotation(Component.class).value().equals("")){
                            //设置bean的id
                            key = aClass.getAnnotation(Component.class).value();
                        }else if (aClass.isAnnotationPresent(Controller.class) && ! aClass.getAnnotation(Controller.class).value().equals("")){
                            key = aClass.getAnnotation(Controller.class).value();
                        }else if (aClass.isAnnotationPresent(Service.class) && ! aClass.getAnnotation(Service.class).value().equals("")){
                            key = aClass.getAnnotation(Service.class).value();
                        }else if (aClass.isAnnotationPresent(Repository.class) && ! aClass.getAnnotation(Repository.class).value().equals("")){
                            key = aClass.getAnnotation(Repository.class).value();
                        }
                        //实例化放到ioc容器中
                        Object o = aClass.newInstance();

                        //将类名第一个小写作为key
                        if (key.equals("")){
                            //设置默认的bean实例id
                            key = StringUtils.uncapitalize(name);

                        }
                        ioc.put(key,o);
                    }
                } catch (Exception e) {
                    e.printStackTrace();
                }
            }
        }
    }

    public Object getBean(String id){
        return ioc.get(id);
    }

}
- 测试
{
        MyApplicationContext myApplicationContext = new MyApplicationContext(ComponentConfig.class);
        Object userDao = myApplicationContext.getBean("userDao");
        System.out.println(userDao);
        //自定义了bean的id
        Object testComponent = myApplicationContext.getBean("testComponent");
        System.out.println(testComponent);
        System.out.println("容器创建成功");
    }
- 结果
二.AOP
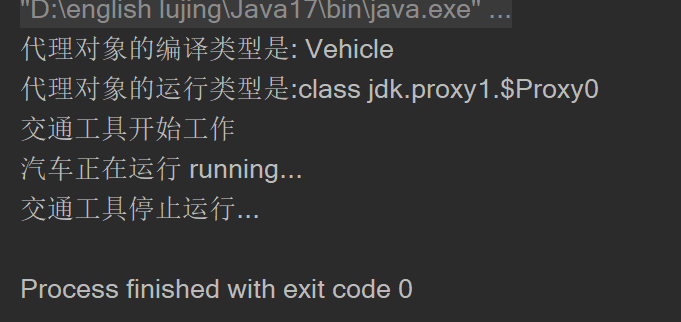
动态代理
- 使用接口接收对象实例
- 使用代理对象调用目标对象的方法
- 使用动态代理可以减少代码的冗余度,提高代码的复原性
- 交通工具接口
public interface Vehicle {
    public void run();
}
- 两个实现交通工具接口的类
public class Car implements Vehicle{
    @Override
    public void run() {
        System.out.println("汽车正在运行 running...");
    }
}

public class Ship implements Vehicle{
    @Override
    public void run() {
        System.out.println("轮船正在运行 running...");
    }
}
- 动态代理类
public class ProxyVehicleProvider {
    //设置一个代理对象的接口
    private Vehicle targetVehicle;

    //构造器初始化代理对象接口
    public ProxyVehicleProvider(Vehicle vehicle){
        this.targetVehicle = vehicle;
    }

    //获取代理对象
    public Vehicle getProxy(){
        //获取类加载器
        ClassLoader classLoader = targetVehicle.getClass().getClassLoader();

        //获取类的接口对象
        Class<?>[] interfaces = targetVehicle.getClass().getInterfaces();

        //创建一个InvocationHandler匿名内部类对象,因为InvocationHandler是接口不能被实例化
        InvocationHandler invocationHandler = new InvocationHandler() {
            /**
             *
             * @param proxy 代理的对象
             * @param method 要调用的方法
             * @param args 调用方法的参数数组
             * @return 返回调用方法的返回
             * @throws Throwable
             */
            @Override
            public Object invoke(Object proxy, Method method, Object[] args) throws Throwable {
                System.out.println("交通工具开始工作");

                //使用反射调用方法
                Object result = method.invoke(targetVehicle, args);

                System.out.println("交通工具停止运行...");
                return result;
            }
        };


        //使用Proxy对象的newProxyInstance()方法获取一个代理对象
        //该方法需要传入类加载器ClassLoader,类的接口信息Interfaces,InvocationHandler
        Vehicle proxy = (Vehicle)Proxy.newProxyInstance(classLoader, interfaces,invocationHandler);
        return proxy;
    }

}
- 测试
{
        //创建一个交通工具
        Vehicle vehicle = new Car();

        //创建代理对象
        ProxyVehicleProvider proxyVehicleProvider = new ProxyVehicleProvider(vehicle);

        //获取交通工具的代理对象
        Vehicle proxy = proxyVehicleProvider.getProxy();

        //代理对象的编译类型是Vehicle
        System.out.println("代理对象的编译类型是: Vehicle");
        System.out.println("代理对象的运行类型是:" + proxy.getClass());

        //使用代理对象调用交通工具的方法
        proxy.run();

    }
- 结果
AOP切面编程快速入门
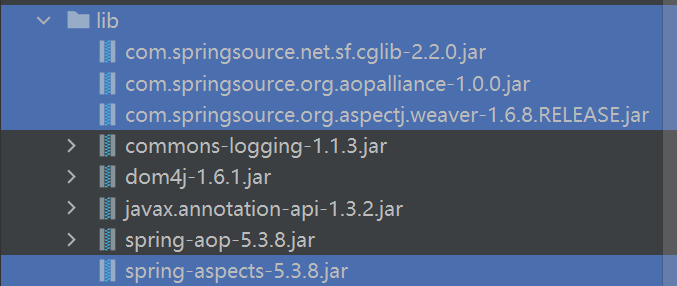
- 在spring中的AOP切面编程需要导入以下四个包
-
@Aspect:标识切面类的注解 -
标识切面方法的常用注解
@Before:信息的前置通知,在方法执行前调用@AfterRunning:信息的后置通知,在方法执行后调用@AfterThrowing:异常信息通知,执行方法出现异常时调用@After:信息的最终通知,方法执行完和异常处理完后执行
-
案例:在Animal对象的getSum()方法前后切入方法
-
SmartAnimal接口
public interface SmartAnimal { public int getSum(int a,int b); public int getSub(int a,int b); } -
Animal类
@Component
public class Animal implements SmartAnimal{

    @Override
    public int getSum(int a, int b) {
        int result = a+b;
        System.out.println("方法内部打印result =" + result);
        return result;
    }

    @Override
    public int getSub(int a, int b) {
        int result = a-b;
        System.out.println("方法内部打印result =" + result);
        return result;
    }
}
- SmartAnimalAspect切面类
- 使用
@Aspect注解标识 - 切面方法的形参为
JoinPoint接口类型,通过该接口可以获取被切入方法的信息
package com.hsp.spring.aop.aspect;
import org.aspectj.lang.JoinPoint;
import org.aspectj.lang.Signature;
import org.aspectj.lang.annotation.*;
import org.springframework.stereotype.Component;
import java.util.Arrays;
import java.util.List;
/**
* @Projectname: spring
* @Filename: SmartAnimalAspect
* @Author: 杨逸
* @Data:2023/6/5 10:10
* @Description: 切面类
*/
//使用切面注解标识切面类
@Aspect
//加入ioc容器
@Component
public class SmartAnimalAspect {
/**
* 使用前置信息通知注解标识方法
* 注解的值传入一个切入表达式,格式:execution(访问修饰符 返回类型 全类名.方法名(参数的数据类型1,参数的数据类型2,..))
*
* @param joinPoint 切入连接点接口,通过该接口可以获得切入方法的信息
*/
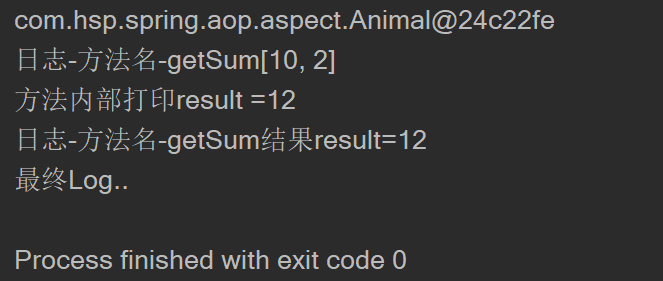
@Before(value = "execution(public int com.hsp.spring.aop.aspect.Animal.getSum(int,int))")
public void showBeginLog(JoinPoint joinPoint) {
//获取切入方法的名称
Signature signature = joinPoint.getSignature();
String name = signature.getName();
//获取切入方法的参数列表
Object[] args = joinPoint.getArgs();
//打印日志信息
System.out.println("日志-方法名-" + name + "参数:" + Arrays.asList(args));
}
/**
* 信息后置通知,在方法结束后执行
*
* @param joinPoint
*/
@AfterReturning(value = "execution(public int com.hsp.spring.aop.aspect.Animal.getSum(int,int ))")
public void showSuccessEndLog(JoinPoint joinPoint) {
Signature signature = joinPoint.getSignature();
String name = signature.getName();
Object[] args = joinPoint.getArgs();
int result = 0;
for (Object arg : args) {
result += (int) arg;
}
System.out.println("日志-方法名-" + name + "结果result=" + result);
}
/**
* 星号(*)在切入表达式表示通配符,形参列表使用两个点(..)不是通配符
* execution(* * *.*(..)):表示所有在同一个ioc容器类的方法都会被切入
*
* @param joinPoint
*/
@AfterThrowing(value = "execution(public int com.hsp.spring.aop.aspect.Animal.*(..))")
public void showExceptionLog(JoinPoint joinPoint) {
System.out.println("Exception Log...");
}
/**
* 切入到方法最后执行
*
* @param joinPoint
*/
@After(value = "execution(public int com.hsp.spring.aop.aspect.Animal.*(..))")
public void showFinalEndLog(JoinPoint joinPoint) {
System.out.println("最终Log..");
}
}
- xml配置
- 使用
<aop:aspectj-autoproxy/>标签开启基于注解的aop切
<?xml version="1.0" encoding="UTF-8"?>
<beans xmlns="http://www.springframework.org/schema/beans"
       xmlns:xsi="http://www.w3.org/2001/XMLSchema-instance"
       xmlns:context="http://www.springframework.org/schema/context"
       xmlns:aop="http://www.springframework.org/schema/aop"
       xsi:schemaLocation="http://www.springframework.org/schema/beans http://www.springframework.org/schema/beans/spring-beans.xsd http://www.springframework.org/schema/context https://www.springframework.org/schema/context/spring-context.xsd http://www.springframework.org/schema/aop https://www.springframework.org/schema/aop/spring-aop.xsd">

    <!--开启注解扫描-->
    <context:component-scan base-package="com.hsp.spring.aop.aspect" />

    <!--开启基于注解的aop-->
    <aop:aspectj-autoproxy/>
</beans>
- 测试
- 使用接口接收ioc的bean,返回的bena是类型是Proxy代理类型
ClassPathXmlApplicationContext ioc = new ClassPathXmlApplicationContext("beans07.xml");
//使用接口接收
SmartAnimal bean =  (SmartAnimal) ioc.getBean("animal");
System.out.println(bean);
bean.getSum(10,2);
- 结果
切入表达式
- 语法:
execution(访问修饰符 方法返回类型 全类名.切入的方法名(形参列表的数据类型)) - 切入表达式也支持逻辑运行(&&,||,!),通过逻辑运算可以匹配多个切入方法
- 也可以使用通配符匹配多个切入方法,访问修饰符,方法返回类型,全类名和切入方法的通配符是星号
*,形参列表数据类型的通配符是两个点.. - 可以使用在实现接口的类上也可以使用在接口上,ioc容器返回的是Proxy代理类型
- 还可以使在没有实现接口的类上,ioc容器返回的是CGlib的子类,实现接口和没实现接口的类返回的代理类型是不一样的
切入点表达式的复用
- 在使用
@JoinCut注解在切面类中定义一个切入点,在一个无返回值无参数的方法中定义切入点
  //定义一个切入点,传入一个切入表达式
    @Pointcut(value = "execution(public void com.hsp.spring.aop.aspect.homework01.*.*())")
    //定义一个无返回值,无参数,无方法体的方法作为切入点
    public void myJoinPoint(){

    }
- 在切入表达式中使用切入点的名称引用该切入点
//使用切入点,传入一个切入点
@Before(value = "myJoinPoint()")
- 案例
@Aspect
@Component
public class SmartUsbInterface {

    //定义一个切入点,传入一个切入表达式
    @Pointcut(value = "execution(public void com.hsp.spring.aop.aspect.homework01.*.*())")
    //定义一个无返回值,无参数,无方法体的方法作为切入点
    public void myJoinPoint(){

    }
    //@Before(value = "execution(public void com.hsp.spring.aop.aspect.homework01.*.*())")
    //使用切入点,传入一个切入点
    @Before(value = "myJoinPoint()")
    public void showBeginLog(JoinPoint joinPoint){
        System.out.println("使用切入点的切入方法===");
        Signature signature = joinPoint.getSignature();
        String name = signature.getName();
        System.out.println(name + "方法的前置通知");
        System.out.println("机器开机...");
    }

    @After(value = "execution(public void com.hsp.spring.aop.aspect.homework01.*.*())")
    public void showSuccessEndLog(JoinPoint joinPoint){
        Signature signature = joinPoint.getSignature();
        String name = signature.getName();
        System.out.println(name + "方法的后置最终通知");
        System.out.println("机器停止工作,关机");
    }
}
JoinPoint类的常用方法
- 介入点类,切入方法的参数
JoinPoint.getSignature(),获取方法的信息签名,返回一个Signature对象Signatre.getName(),获得切入方法的方法名Signature.getDeclaringTypeName,获得切入方法的所属类的全类名Signature.getDeclaringType().getSmipleName(),获得切入方法的所属类的简单类名Signature.getModifiers(),获得切入方法的访问修饰符(public,private...),返回的是数值
JoinPoint.getArgs(),获得切入方法的参数JoinPoint.getTarget(),获得被代理的对象JoinPoint.getThis(),获得代理对象本身
@After(value = "execution(public int com.hsp.spring.aop.aspect.Animal.*(..))")
    public void showFinalEndLog(JoinPoint joinPoint) {
        //获得切入方法的签名信息
        Signature signature = joinPoint.getSignature();
        //获得切入方法的方法名
        String name = signature.getName();
        //获得切入方法所属类的全类名
        String declaringTypeName = signature.getDeclaringTypeName();
        //获得切入方法的简单类名
        String simpleName = signature.getDeclaringType().getSimpleName();
        //获得切入方法的访问修饰级别
        int modifiers = signature.getModifiers();
        System.out.println(modifiers);
        //获得切入方法的参数列表
        Object[] args = joinPoint.getArgs();
        //获得切入对象的被代理对象
        Object target = joinPoint.getTarget();
        //获得切入对象的代理对象
        Object aThis = joinPoint.getThis();
        System.out.println("最终Log..");
    }
获得切入方法的返回结果
- 通过切入方法的注解属性returning获得返回值
- 再将返回值传入切入方法即可使用被切入方法的返回值
/**
* 信息后置通知,在方法结束后执行
*使用注解的returning属性给返回值设置变量名,并在切入方法参数列表中传入该变量,
* 即可使用被切入方法的返回值
* @param joinPoint
*/
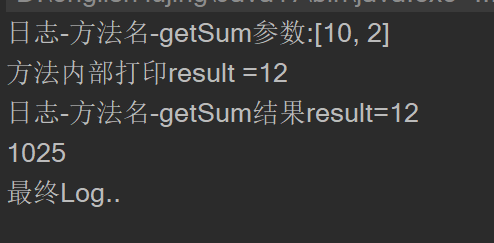
@AfterReturning(value = "execution(public int com.hsp.spring.aop.aspect.Animal.getSum(int,int ))",returning = "result")
public void showSuccessEndLog(JoinPoint joinPoint,int result) {
Signature signature = joinPoint.getSignature();
String name = signature.getName();
System.out.println("日志-方法名-" + name + "结果result=" + result);
}
获得切入方法抛出的异常(通过@AfterThrowing注解的throwing属性获得)
- 通过@AfterThrowing注解的throwing属性给抛出的异常设置的变量名
- 再传入到切入方法即可使用该异常对象
/**
     * 星号(*)在切入表达式表示通配符,形参列表使用两个点(..)不是通配符
     * execution(* * *.*(..)):表示所有在同一个ioc容器类的方法都会被切入
     *通过throwing属性给异常对象设置变量名
     * @param joinPoint
     */
    @AfterThrowing(value = "execution(public int com.hsp.spring.aop.aspect.Animal.*(..))",throwing = "exception")
    public void showExceptionLog(JoinPoint joinPoint,Throwable exception) {
        System.out.println( "异常信息="+ exception.getMessage());
        System.out.println("Exception Log...");
    }
环绕通知(@Around注解)
- 环绕通知将前置通知,后置通知,异常通知,最终通知集合在一起,使用一个
@Around注解就能切入四个切入点 - 环绕通知的切入方法需要传入ProceedingPoint接口的参数,通过该接口可以获取被切入方法的信息
ProceedPoint.proceed()方法表示的是被切入的方法,在该方法前语句表示前置通知,在该方法后的语句表示后置通知- 在环绕通知切入方法里使用
try-catch-finally的结构实现前置通知,后置通知,异常通知和最终通知的集合
@Around(value = "execution(public void com.hsp.spring.aop.aspect.*(int,int))")
    public void around(ProceedingJoinPoint proceedingJoinPoint){
        //在环绕通知切入方法里使用try-catch-finally的结构实现前置通知,后置通知,异常通知和最终通知的集合
        //ProceedingPoint.proceed()方法代表被切入方法
        //在该方法前语句表示前置通知,在该方法后的语句表示后置通知
        try{
            //前置通知部分
            System.out.println("前置通知代码部分");

            //调用被切入的方法
            Object proceed = proceedingJoinPoint.proceed();

            //后置通知部分
            System.out.println("后置通知代码部分");
        }catch (Throwable e) {
            //catch块代表异常通知
            System.out.println("异常通知代码部分");
            e.printStackTrace();
        } finally {
            System.out.println("最终通知代码部分");
            //finally块代表最终通知
        }
    }
同时配置多个切面类的优先级问题
- 通过
@Order注解的valie属性设置切面类的优先级,数值越低优先级越高,默认是2^31 - 1(二的三十一次方减一) @Order注解使用在切面类上- 多个切面类的方法执行顺序类型类似栈的特点,先进后出,也类似Filter过滤器链式调用的特点
graph LR;

subgraph 切面类A
a_method1[(前置通知方法)];
a_method2[后置通知方法];
a_method3[最终通知方法];
end

subgraph 切面类B
b_method1[前置通知方法];
b_method2[后置通知方法];
b_method3[最终通知方法];
end

method((被切入方法));

a_method1 ==1==>b_method1;
b_method1 ==2==>method;
method ==3==> b_method2;
b_method2 ==4==> b_method3;
b_method3 ==5==> a_method2;
a_method2 ==6==> a_method3;
//设置切面类的优先级
@Order(value = 1)
//使用切面注解标识切面类
@Aspect
//加入ioc容器
@Component
public class SmartAnimalAspect {
    ....
}
基于XML配置的aop切面编程
- 先配置好所有的bean,包括切面类的bean
- 然后使用
<aop:config/>标签配置切面类
SmartAnimal接口
public interface SmartAnimal {
    public int getSum(int a,int b);
    public int getSub(int a,int b);
}
SmartAnimal接口的实现类Animal
public class Animal implements SmartAnimal {

    @Override
    public int getSum(int a, int b) {
        int result = a+b;
        System.out.println("方法内部打印result =" + result);
        return result;
    }

    @Override
    public int getSub(int a, int b) {
        int result = a-b;
        System.out.println("方法内部打印result =" + result);
        return result;
    }
}
SmartAnimalAspect切面类,
public class SmartAnimalAspect {

    public void showBeginLog(JoinPoint joinPoint) {
        //获取切入方法的名称
        Signature signature = joinPoint.getSignature();
        String name = signature.getName();

        //获取切入方法的参数列表
        Object[] args = joinPoint.getArgs();

        //打印日志信息
        System.out.println("日志-方法名-" + name + "参数:" + Arrays.asList(args));

    }

    public void showSuccessEndLog(JoinPoint joinPoint,int result) {
        Signature signature = joinPoint.getSignature();
        String name = signature.getName();


        System.out.println("日志-方法名-" + name + "结果result=" + result);
    }

    public void showExceptionLog(JoinPoint joinPoint,Throwable exception) {
        System.out.println( "异常信息="+ exception.getMessage());
        System.out.println("Exception Log...");
    }

    public void showFinalEndLog(JoinPoint joinPoint) {
        //获得切入方法的签名信息
        Signature signature = joinPoint.getSignature();
        //获得切入方法的方法名
        String name = signature.getName();
        //获得切入方法所属类的全类名
        String declaringTypeName = signature.getDeclaringTypeName();
        //获得切入方法的简单类名
        String simpleName = signature.getDeclaringType().getSimpleName();
        //获得切入方法的访问修饰级别
        int modifiers = signature.getModifiers();
        System.out.println(modifiers);
        //获得切入方法的参数列表
        Object[] args = joinPoint.getArgs();
        //获得切入对象的被代理对象
        Object target = joinPoint.getTarget();
        //获得切入对象的代理对象
        Object aThis = joinPoint.getThis();
        System.out.println("最终Log..");
    }
    public void around(ProceedingJoinPoint proceedingJoinPoint){
        //在环绕通知切入方法里使用try-catch-finally的结构实现前置通知,后置通知,异常通知和最终通知的集合
        //ProceedingPoint.proceed()方法代表被切入方法
        //在该方法前语句表示前置通知,在该方法后的语句表示后置通知
        try{
            //前置通知部分
            System.out.println("前置通知代码部分");

            //调用被切入的方法
            Object proceed = proceedingJoinPoint.proceed();

            //后置通知部分
            System.out.println("后置通知代码部分");
        }catch (Throwable e) {
            //catch块代表异常通知
            System.out.println("异常通知代码部分");
            e.printStackTrace();
        } finally {
            System.out.println("最终通知代码部分");
            //finally块代表最终通知
        }

    }

}
xml配置
- 使用
<aop:config/>标签配置aop切面编程的切面配置 - 使用
<aop:pointcut/>标签配置切入点id属性配置切入点的idexpression属性配置切入表达式
- 使用
<aop:aspect/>标签配置切面类ref属性引用配置的切面beanorder属性配置切面类的优先级
- 使用
<aop:before/>等标签,配置切入方法method属性配置切面类的切入方法pointcut-ref属性配置切入点returning属性配置被切入方法的返回值的变量名throwing属性配置被切入方法抛出的异常对象的变量名
<?xml version="1.0" encoding="UTF-8"?>
<beans xmlns="http://www.springframework.org/schema/beans"
       xmlns:xsi="http://www.w3.org/2001/XMLSchema-instance" xmlns:aop="http://www.springframework.org/schema/aop"
       xsi:schemaLocation="http://www.springframework.org/schema/beans http://www.springframework.org/schema/beans/spring-beans.xsd http://www.springframework.org/schema/aop https://www.springframework.org/schema/aop/spring-aop.xsd">

    <!--配置切面类的bean-->
    <bean class="com.hsp.spring.aop.xml.SmartAnimalAspect" id="aspect"/>
    <!--配置其他bean-->
    <bean class="com.hsp.spring.aop.xml.Animal" id="animal"/>

    <!--配置aop切面类,使用先前配置的切面类的bean-->
    <aop:config>
        <!--先配置切入点-->
        <aop:pointcut id="pointcut" expression="execution(public int com.hsp.spring.aop.xml.Animal.getSum(int,int))"/>
        <!--然后配置切面bean,设置优先级-->
        <aop:aspect ref="aspect" order="1">
            <!--最后配置切入方法,配置切入方法的切入点-->
            <!--配置前置通知方法-->
            <aop:before method="showBeginLog" pointcut-ref="pointcut"/>
            <!--配置后置通知方法,设置被切入方法的返回值变量名-->
            <aop:after-returning method="showSuccessEndLog" pointcut-ref="pointcut" returning="result"/>
            <!--配置异常通知方法,设置抛出异常的异常变量名-->
            <aop:after-throwing method="showExceptionLog" pointcut-ref="pointcut" throwing="exception"/>
            <!--配置最终通知方法-->
            <aop:after method="showFinalEndLog" pointcut-ref="pointcut"/>
        </aop:aspect>
    </aop:config>

</beans>
测试
ClassPathXmlApplicationContext classPathXmlApplicationContext = new ClassPathXmlApplicationContext("beans09.xml");
SmartAnimal bean = (SmartAnimal) classPathXmlApplicationContext.getBean("animal");
bean.getSum(10,2);
结果
三.jdbcTemplate
快速入门
- 配置数据库信息
- jdbc.properties配置文件
jdbc.user=root
jdbc.password=hsp
jdbc.driver=com.mysql.jdbc.Driver
jdbc.url=jdbc:mysql://127.0.0.1:3306/spring
- 配置ioc容器
- 需配置数据库源DataSource,配置JdbcTemplate对象
- jdbcTemplate_ioc.xml配置文件
<?xml version="1.0" encoding="UTF-8"?>
<beans xmlns="http://www.springframework.org/schema/beans"
       xmlns:xsi="http://www.w3.org/2001/XMLSchema-instance"
       xmlns:context="http://www.springframework.org/schema/context"
       xsi:schemaLocation="http://www.springframework.org/schema/beans http://www.springframework.org/schema/beans/spring-beans.xsd http://www.springframework.org/schema/context https://www.springframework.org/schema/context/spring-context.xsd">

    <!--配置要扫描的包-->
    <context:component-scan base-package="com.hsp.spring.jdbcTemplate"/>
    <!--引入外部的配置文件-->
    <context:property-placeholder location="classpath:jdbc.properties"/>
    <!--配置数据源对象-->
    <bean class="com.mchange.v2.c3p0.ComboPooledDataSource" id="dataSource">
        <!--通过外部配置文件设置数据源的属性-->
        <property name="user" value="${jdbc.user}"/>
        <property name="password" value="${jdbc.password}"/>
        <property name="driverClass" value="${jdbc.driver}"/>
        <property name="jdbcUrl" value="${jdbc.url}"/>
    </bean>
    <!--配置jdbcTemplate对象-->
    <bean class="org.springframework.jdbc.core.JdbcTemplate" id="jdbcTemplate">
        <!--通过引用给jdbcTemplate对象设置属性-->
        <property name="dataSource" ref="dataSource"/>
    </bean>
    <!--配置NamedParameterJdbcTemplate对象-->
    <bean class="org.springframework.jdbc.core.namedparam.NamedParameterJdbcTemplate" id="namedParameterJdbcTemplate">
        <!--通过构造器设置数据库源DataSource-->
        <constructor-arg name="dataSource" ref="dataSource"/>
    </bean>

</beans>
使用jdbcTemplate向数据库插入数据
- 调用JdbcTemplate.update(sql,arg)方法
 /**
     * 使用jdbcTemplate向数据库插入数据
     */
    @Test
    public void testJdbcTemplateOfInsert(){
        //获得jdbcTemplate对象
        JdbcTemplate jdbcTemplate = ioc.getBean(JdbcTemplate.class);
        //添加方式一:SQL语句
        String sql = "insert into monster (id,name,skill) values (500,'红孩子1','喷火')";
        jdbcTemplate.execute(sql);
        System.out.println("方式一插入数据成功");
        //添加方式二:预处理SQL语句
        sql = "INSERT INTO monster (id,name,skill) VALUES (?,?,?)";
        int row = jdbcTemplate.update(sql, 600, "红孩子2", "枪法");
        System.out.println("方式二插入数据成功,影响行数:"+row);
        System.out.println("ok");
    }
测试jdbcTemplate向数据库修改数据
- 调用JdbcTemplate.update(sql,arg)方法
  /**
     * 测试jdbcTemplate向数据库修改数据
     */
    @Test
    public void testJdbcTemplateOfUpdate(){
        //获得jdbcTemplate对象
        JdbcTemplate jdbcTemplate = ioc.getBean(JdbcTemplate.class);
        //编写SQL语句
        String sql = "UPDATE monster SET skill = ? where id = ?";
        //调用update()方法
        int row = jdbcTemplate.update(sql, "加强的技能", 100);
        System.out.println("数据修改成功,影响行数:"+row);
    }
jdbcTemplate的批量处理
- 调用JdbcTEmplate.batchupdate(sql,Map,arg)方法
 /**
     * 测试jdbcTemplate的批量处理
     * 向数据库插入两条数据
     */
    @Test
    public void testJdbcTemplateOfBatchUpdate(){
        JdbcTemplate jdbcTemplate = ioc.getBean(JdbcTemplate.class);
        String sql = "INSERT INTO monster (id,name,skill) VALUES (?,?,?)";
        //准备要插入的数据
        List<Object[]> data = new ArrayList<>();
        //Object数组准备的是预处理SQL需要填入的参数
        data.add(new Object[]{101,"老虎","吃肉"});
        data.add(new Object[]{102,"老鼠","吃米"});

        //调用batchUpdate()方法
        int[] row = jdbcTemplate.batchUpdate(sql, data);
        for (int i = 0; i < row.length; i++) {
            System.out.println("第"+ i + "次批量插入成功,影响行数:" + row[i]);
        }
        System.out.println("批量插入成功");
    }
jdbcTemplate的单条数据查询
- 调用JdbcTemplate.queryForObject(sql,RowMapper,arg)方法
/**
     * 测试jdbcTemplate的单条数据查询
     */
    @Test
    public void testJdbcTemplateOfQuery(){
        JdbcTemplate jdbcTemplate = ioc.getBean(JdbcTemplate.class);
        //查询准备
        String sql = "SELECT id,name,skill FROM monster WHERE id = ?";
        //查询需要一个RowMapper接口类的实现类参数
        Monster monster = jdbcTemplate.queryForObject(sql, new BeanPropertyRowMapper<>(Monster.class), 100);
        System.out.println("查询到的monster="+monster);
        System.out.println("测试jdbc查询成功");
    }
jdbcTemplate的多条数据查询
- 调用JdbcTemplate.query(sql,RowMapper,arg)方法
  /**
     * 测试jdbcTemplate的多条数据查询
     */
    @Test
    public void testJdbcTemplateOfQueries(){
        JdbcTemplate jdbcTemplate = ioc.getBean(JdbcTemplate.class);
        //查询准备
        String sql = "SELECT id,name,skill FROM monster WHERE id >= ?";
        //查询需要一个RowMapper接口类的实现类参数
        List<Monster> query = jdbcTemplate.query(sql, new BeanPropertyRowMapper<Monster>(Monster.class), 400);
        for (Monster monster : query) {
            System.out.println("查询到的monster=" + monster);
        }
        System.out.println("测试jdbc查询成功");
    }
jdbcTemplate查询单行单列
- 调用JdbcTemplate.queryForObject(sql,Class,arg)方法
 /**
     * 测试jdbcTemplate查询单行单列
     */
    @Test
    public void testJdbcTemplateOfQuerySingleRowAndSingleCol(){
        JdbcTemplate jdbcTemplate = ioc.getBean(JdbcTemplate.class);
        String sql = "SELECT name FROM monster WHERE id = ?";
        //查询单行单列,参数需要一个返回的数据类型的class类对象
        String s = jdbcTemplate.queryForObject(sql, String.class,100);
        System.out.println("查询到的数据="+s);
        System.out.println("查询单行单列成功");
    }
NamedParameterJdbcTemplate使用Map传入具名参数完成操作,比如添加
- SQL语句中使用
:id的形式设置参数的名称,然后在Map中设置参数的值 - 调用NamedParameterJdbcTemplate.update(sql,Map)方法
 /**
     * 测试使用具名参数,完成添加数据
     * 使用Map传入具名参数完成操作,比如添加
     */
    @Test
    public void testNamedParameterJdbcTemplateByMap(){
        //获取namedParameterJdbcTemplate 对象
        NamedParameterJdbcTemplate namedParameterJdbcTemplate = ioc.getBean(NamedParameterJdbcTemplate.class);
        //使用具名参数,编写SQL语句时,需要指定参数的名称比如 ":id"
        String sql = "INSERT INTO monster (id,name,skill) VALUES (:id,:name,:skill)";
        //使用一个Map给参数设置值
        HashMap<String, Object> map = new HashMap<>();
        map.put("id",104);
        map.put("name","黄鼠狼");
        map.put("skill","给鸡拜年");

        //调用namedParameterJdbcTemPlate.update()方法
        int row = namedParameterJdbcTemplate.update(sql, map);
        System.out.println("插入数据成功,影响行数:" + row);
        System.out.println("使用具名参数添加数据成功");

    }
使用sqlParametersSource添加一条数据
- 使用SqlParameter接口的实现类BeanPropertySqlParamneter封装一个实体类
- 调用NamedParameterJdbcTemplate.update(sql,SqlParameterSource)方法
 /**
     * 测试使用sqlParametersSource添加一条数据
     */
    @Test
    public void testNamedParameterJdbcTemplateBySqlParameterSource(){
        NamedParameterJdbcTemplate namedParameterJdbcTemplate = ioc.getBean(NamedParameterJdbcTemplate.class);

        //准备参数
        String sql = "INSERT INTO monster (id,name,skill) VALUES (:id,:name,:skill)";
        //准备一个实体对象
        Monster monster = new Monster(106, "孙悟空", "大闹天宫");
        //创建一个SqlParameterSource接口的实例
        BeanPropertySqlParameterSource sqlParameterSource = new BeanPropertySqlParameterSource(monster);
        int row = namedParameterJdbcTemplate.update(sql, sqlParameterSource);
        System.out.println("添加数据成功,影响的行数:" + row);
        System.out.println("使用sqlParameterSource添加数据成功");
    }
测试MonsterDao添加数据
- MonsterDao类
package com.hsp.spring.jdbcTemplate;

import com.hsp.spring.beans.Monster;
import org.springframework.jdbc.core.JdbcTemplate;
import org.springframework.stereotype.Repository;

import javax.annotation.Resource;

/**
 * @Projectname: spring
 * @Filename: MonsterDao
 * @Author: 杨逸
 * @Data:2023/9/5 14:17
 * @Description: 测试jdbcTemplate的Dao
 *将jdbcTemplate注入为成员属性
 */
@Repository
public class MonsterDao {
    @Resource
    private JdbcTemplate jdbcTemplate;

    public void saveMonster(Monster monster){
        String sql = "INSERT INTO monster(id,name,skill) VALUES(?,?,?)";
        jdbcTemplate.update(sql,monster.getId(),monster.getName(),monster.getSkill());
        System.out.println("MonsterDao添加添加数据成功");
    }
}
- 测试方法
 /**
     * 测试MonsterDao添加数据
     */
    @Test
    public void testMonsterDao(){
        MonsterDao bean = ioc.getBean(MonsterDao.class);
        //准备数据
        Monster monster = new Monster(111, "kk", "java");
        bean.saveMonster(monster);
        System.out.println("测试MonsterDao保存数据成功");
    }
声明式事务
-
使用一个
Transactional注解代替传统事务的手动开启和手动提交 -
常用的声明式事务传递参数:Propagation.REQUIRED,Progatation.REQUIRES_NEW
Propagation.REQUIRED:表示在当前事务内不再开启新的事务Progatation.REQUIRES_NEW:表示在当前事务可以开启新的事务
-
设置声明式事务的隔离级别,通过isolation属性设置,默认是当前数据库系统的默认隔离级别
- 比如Mysql,默认的隔离级别是
REPATETABLE_READ可重复读 - 通过
@Transactional(isolation = Isolation.READ_COMMITTED)设置隔离级别为读已提交
- 比如Mysql,默认的隔离级别是
-
声明式事务的超时回滚,通过
timeout属性设置超时回滚,单位是秒 -
ioc容器配置文件
-
配置声明式事务对象DataSourceTransactionManager,需要给声明式事务对象配置数据源
-
开启基于注解的声明式事务
<tx:annotation-driven transaction-manager="dataSourceTransactionManager"/>
<?xml version="1.0" encoding="UTF-8"?>
<beans xmlns="http://www.springframework.org/schema/beans"
       xmlns:xsi="http://www.w3.org/2001/XMLSchema-instance"
       xmlns:context="http://www.springframework.org/schema/context" xmlns:tx="http://www.springframework.org/schema/tx"
       xsi:schemaLocation="http://www.springframework.org/schema/beans http://www.springframework.org/schema/beans/spring-beans.xsd http://www.springframework.org/schema/context https://www.springframework.org/schema/context/spring-context.xsd http://www.springframework.org/schema/tx http://www.springframework.org/schema/tx/spring-tx.xsd">

    <!--添加扫描的包-->
    <context:component-scan base-package="com.hsp.spring.tx.dao"/>
    <context:component-scan base-package="com.hsp.spring.tx.service"/>

    <!--引入外部文件-->
    <context:property-placeholder location="classpath:jdbc.properties"/>
    <!--配置数据源-->
    <bean class="com.mchange.v2.c3p0.ComboPooledDataSource" id="dataSources">
        <property name="user" value="${jdbc.user}"/>
        <property name="password" value="${jdbc.password}"/>
        <property name="driverClass" value="${jdbc.driver}"/>
        <property name="jdbcUrl" value="${jdbc.url}"/>
    </bean>
    <!--配置JdbcTemplate对象-->
    <bean class="org.springframework.jdbc.core.JdbcTemplate" id="jdbcTemplate">
        <property name="dataSource" ref="dataSources"/>
    </bean>

    <!--配置声明式事务对象-->
    <bean class="org.springframework.jdbc.datasource.DataSourceTransactionManager" id="dataSourceTransactionManager">
        <!--配置数据源-->
        <property name="dataSource" ref="dataSources"/>
    </bean>
    <!--配置基于注解的声明式事务-->
    <tx:annotation-driven transaction-manager="dataSourceTransactionManager"/>
</beans>
- 使用声名式事务的案例演示
package com.hsp.spring.tx.service;

import com.hsp.spring.tx.dao.GoodsDao;
import com.hsp.spring.tx.dao.UserDao;
import org.springframework.stereotype.Service;
import org.springframework.transaction.annotation.Isolation;
import org.springframework.transaction.annotation.Propagation;
import org.springframework.transaction.annotation.Transactional;

import javax.annotation.Resource;

/**
 * @Projectname: spring
 * @Filename: GoodsService
 * @Author: 杨逸
 * @Data:2023/9/5 16:11
 * @Description: 演示声明式事务的service
 */
@Service
public class GoodsService {
    @Resource
    private GoodsDao goodsDao;

    @Resource
    private UserDao userDao;

    /**
     * 购买商品的方法
     *  @Transactional 开启声明式事务
     *  需要在配置文件中配置
     * @param userId 用户id
     * @param goodsId 商品id
     * @param amount 购买数量
     */
    //声明式事务事务传递propagation的默认参数是Propagation.REQUIRED,表示事务内不会开启新的事务
    //常用的还有Propagation.REQUIRES.NEW,表示事务内如果存在事务则会开启新的事务
    //声明式事务注解会通过代理的方法关闭自动提交,如果发生异常就回滚,没有发生异常就提交
    //注解帮助我们自动完成这些操作,避免繁琐的重复
    @Transactional(propagation = Propagation.REQUIRED)
    public void buyGoods(int userId,int goodsId,int amount){

        //输出用户的购买信息
        System.out.printf("用户id为%d的用户购买商品id为%d的商品%d个\n",userId,goodsId,amount);

        //获取商品的价格
        Float price = goodsDao.queryPriceById(goodsId);

        //获取用户的余额
        double money = userDao.queryAccountById(userId);
        //减少用户的余额
        userDao.updateAccountById(userId,money-price*amount);
        System.out.println("用户余额修改成功");
        //获取商品的库存
        Integer num = goodsDao.queryAmountById(goodsId);
        //减少商品的库存
        goodsDao.updateAmount(goodsId,num-amount);
        System.out.println("商品库存修改成功");
    }

    /**
     * 通过注解Transactional的isolation属性设置事务的隔离级别
     * 默认隔离级别是当前数据库的默认隔离级别,比如Mysql
     * 默认隔离级别是可重复读REPEATABLE_RAED
     * @param goods_id 商品id
     */
    //修改为读已提交
    @Transactional(isolation = Isolation.READ_COMMITTED)
    public void queryPriceById(Integer goods_id){
        Float price = goodsDao.queryPriceById(goods_id);
        System.out.println("第一次查询到的price = " + price);

        price = goodsDao.queryPriceById(goods_id);
        System.out.println("第二次查询到的price = " + price);


    }

    /**
     * 通过timeout属性设置超时回滚为1秒
     * 即当前方法执行时间超过1秒时,就会发生回滚
     * 默认是-1,表示使用当前数据库系统的默认超时时间
     */
    @Transactional(timeout = 2)
    public void updateGoodByTimeout(Integer id,Float price){
        goodsDao.updatePrice(id,price);
        System.out.println("模拟一个超时");
        try {
            Thread.sleep(4000);
        } catch (InterruptedException e) {
            e.printStackTrace();
        }
        goodsDao.updatePrice(id,price);
    }
}
四.SpringMVC
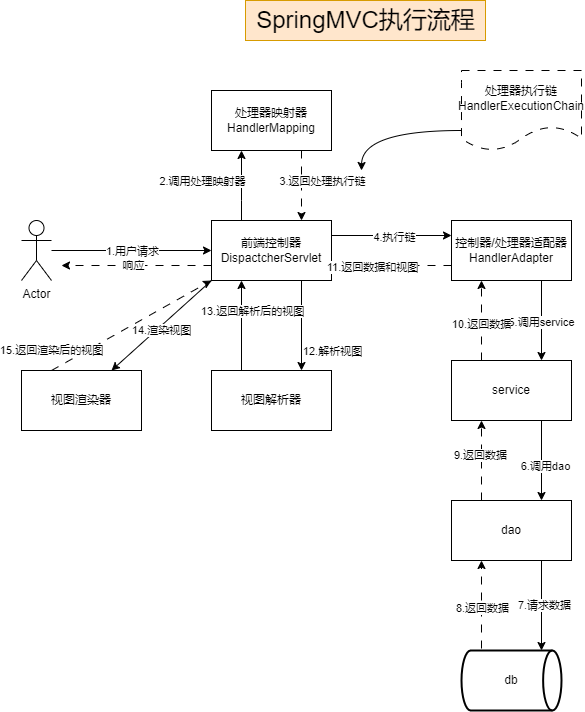
- SpringMVC执行流程
快速入门
- ioc容器配置
- 配置
InternalResourceViewResolver视图解析器,再配置prefix和suffix属性
<?xml version="1.0" encoding="UTF-8"?>
<beans xmlns="http://www.springframework.org/schema/beans"
       xmlns:xsi="http://www.w3.org/2001/XMLSchema-instance"
       xmlns:context="http://www.springframework.org/schema/context"
       xsi:schemaLocation="http://www.springframework.org/schema/beans http://www.springframework.org/schema/beans/spring-beans.xsd http://www.springframework.org/schema/context https://www.springframework.org/schema/context/spring-context.xsd">

    <!--配置扫描的包-->
    <context:component-scan base-package="com.hsp.web"/>

    <!--配置视图解析器-->
    <bean class="org.springframework.web.servlet.view.InternalResourceViewResolver" id="resolver">
        <!--配置视图解析器的两个基本属性-->
        <!--路径前缀-->
        <property name="prefix" value="/pages/"/>
        <!--路径后缀-->
        <property name="suffix" value=".jsp"/>
    </bean>
</beans>
- web配置文件
- 需要配置前端控制器
DispatcherServlet,再在属性contextConfigLocation中设置ioc容器的配置 - 设置前端控制器的映射路径,一般设置为全路径
<?xml version="1.0" encoding="UTF-8"?>
<web-app xmlns="http://xmlns.jcp.org/xml/ns/javaee"
         xmlns:xsi="http://www.w3.org/2001/XMLSchema-instance"
         xsi:schemaLocation="http://xmlns.jcp.org/xml/ns/javaee http://xmlns.jcp.org/xml/ns/javaee/web-app_4_0.xsd"
         version="4.0">

    <!--配置前端控制器,本质也是一个servlet,用户的访问都会经过该控制器-->
    <servlet>
        <servlet-name>dispatcherServlet</servlet-name>
        <servlet-class>org.springframework.web.servlet.DispatcherServlet</servlet-class>
        <!--配置属性contextConfigLocation,指定DispatcherServlet的ioc容器配置文件-->
        <init-param>
            <!--也可以不配置contextConfigLocation,如果不配置默认会去查找/WEB-INF/springDispatcherServlet-servlet.xml文件,如果没有该文件最后就会报错-->
            <param-name>contextConfigLocation</param-name>
            <param-value>classpath:applicationContextMVC.xml</param-value>
        </init-param>
    </servlet>
    <!--配置前端控制器的映射-->
    <servlet-mapping>
        <servlet-name>dispatcherServlet</servlet-name>
        <!--因为所有访问都要经过控制器所以url配置为根目录-->
        <url-pattern>/</url-pattern>
    </servlet-mapping>
</web-app>
RequestMapping注解的入门- 通过该注解可以设置响应特定url的方式
package com.hsp.web;

import org.springframework.stereotype.Controller;
import org.springframework.web.bind.annotation.RequestMapping;

/**
 * @Projectname: SpringMVC
 * @Filename: UserServlet
 * @Author: 杨逸
 * @Data:2023/9/6 19:27
 * @Description: 用户Servlet
 */
//添加一个Controller注解,将该类视为一个控制器注入ioc容器中
//SpringMVC开发Servlet比原生Servlet开发效率高
@Controller
public class UserServlet {

    //响应用户请求的方法

    /**
     * 使用注解RequestMapping配置响应的url
     * 相当于原生Servlet的url-pattern配置
     * @return
     */
    @RequestMapping(value = "/login")
    public String login(){
        System.out.println("用户登录访问中.....");
        //返回登陆成功后页面的名字
        return "login_ok";
    }
}
@RequestMapping注解的基本使用
- 该注解可以标注在控制器或处理器类和方法上共同构成请求的url
- 可以指定只响应特定的请求方式,如:get请求,post请求
标注在类上与标注在方法上的共同构成请求url
@RequestMapping注解标注在处理器类上与被@RequestMapping标注的方法共同构成请求的完整url- 这里
buy()方法请求的完整url:http://ip:port/工程路径/user/buy.jsp
package com.hsp.web;

import org.springframework.stereotype.Controller;
import org.springframework.web.bind.annotation.RequestMapping;
import org.springframework.web.bind.annotation.RequestMethod;

/**
 * @Projectname: SpringMVC
 * @Filename: UserHandler
 * @Author: 杨逸
 * @Data:2023/9/7 10:06
 * @Description: 演示@RequestMapping共同标注在类的方法上,以及指定响应的特定请求
 */
//@RequestMapping注解标注在处理器类上与被@RequestMapping标注的方法共同构成请求的完整url
@RequestMapping(value = "/user")
@Controller
public class UserHandler {
    /**
     * @Request 还可以指定只响应特定的请求方式,比如之响应post请求
     * 通过method属性指定只响应的请求方法,默认只响应get和post请求
     * 指定只响应post请求,method = RequestMethod.POST
     *RequestMethod常用的四个选项:POST,GET,PUT,DELETE
     *
     * 这里buy()方法请求的完整url: http://ip:port/工程路径/user/buy.jsp
     * @return
     */
    @RequestMapping(value = "/buy",method = RequestMethod.POST)
    public String buy(){
        System.out.println("购买商品");
        return "success";
    }
}
通过method属性设置只响应特定请求方式的请求
- 指定只响应post请求,
method = RequestMethod.POST RequestMethod常用的四个选项:POST,GET,PUT,DELETE
 /**
     * @RequestMapping 还可以指定只响应特定的请求方式,比如之响应post请求
     * 通过method属性指定只响应的请求方法,默认只响应get和post请求
     * 指定只响应post请求,method = RequestMethod.POST
     *RequestMethod常用的四个选项:POST,GET,PUT,DELETE
     *
     * 这里buy()方法请求的完整url: http://ip:port/工程路径/user/buy.jsp
     * @return
     */
    @RequestMapping(value = "/buy",method = RequestMethod.POST)
    public String buy(){
        System.out.println("购买商品");
        return "success";
    }
通过param属性设置只响应满足包含特定请求参数的请求
- 设置请求要携带的参数后,如果请求没有携带该参数就会报错
- 也可以设置为
"bookId=100",表示要求请求必须携带参数bookId且值为100,不满足要求就会报错 - 有指定请求参数的方法,方法的形参也必须与其对应
- 限定的多种形式
param1:表示请求必须包含param1参数!=param1:表示请求不能含有param1参数param1=100:表示请求必须包含param1参数,且值为100{"param1=100","param2"}:表示必须包含param1,param2参数,且param1参数的值必须为100
 /**
     *
     * 通过param属性给@RequestMapping 注解设置请求参数
     *设置请求要携带的参数后,如果请求没有携带该参数就会报错
     *
     * 也可以设置为 "bookId=100",表示要求请求必须携带参数bookId且值为100,不满足要求就会报错
     * @param bookId
     * 有指定请求参数的方法,方法的形参也必须与其对应
     * @return
     */
    @RequestMapping(value = "/search",method = RequestMethod.GET,params = {"bookId"})
    public String search(String bookId){
        System.out.println("查询的bookId = " + bookId);
        return "success";
    }
@RequestMapping注解支持Ant风格的资源地址
?:匹配文件名中的一个字符*:匹配文件名中的任意字符**:匹配多层路径- 例如:
user/*/createUser路径匹配user/aaaa/createUser路径.user.???路径匹配user.jsp路径
/**
     * 演示Ant路径的使用,匹配多层路径
     * @return
     */
    @RequestMapping(value = "/message/**")
    public String sendMessage(){
        System.out.println("发送消息");
        return "success";
    }
@RequestMapping注解与路径变量注解@PathVariable配合使用
- 案例演示:
- 在@RequestMapping注解请求路径中使用 "{}"表示路径变量
- 使用@PathVariable注解解析@RequestMapping注解中的路径变量,并传值给实参
- 这样前端可以直接在路径上携带参数的值,而不需要指定参数名,看起来比较简洁
/**
     * 在@RequestMapping注解请求路径中使用 "{}"表示路径变量
     * 使用@PathVariable注解解析@RequestMapping注解中的路径变量,并传值给实参
     * 这样前端可以直接在路径上携带参数的值,而不需要指定参数名,看起来比较简洁
     * 前端的请求url:<a href="user/reg/kk/100"/>
     * @param name 用户名
     * @param id 用户id
     * @return
     */
    @RequestMapping(value = "/reg/{userName}/{userId}")
    public String pathVariableTest(@PathVariable(value = "userName") String name, @PathVariable(value = "userId") String id){
        System.out.println("userName=" + name + "userId=" + id);
        return "success";
    }
各种请求的简写
- get请求可以使用
@GetMapping注解 - post请求可以使用
@PostMapping注解 - put请求可以使用
@PutMapping注解 - delete请求可以使用
@DeleteMapping注解
请求参数的接收
- http请求携带的参数,该参数与方法形参的名称必须一致才能传参成功
/**
     * 前端发出的请求
     *<a href="/user/getParam?param=http请求参数">发送携带参数的请求</a>
     *
     * @param param http请求携带的参数,该参数与方法形参的名称必须一致才能传参成功
     * @return
     */
    @RequestMapping("/getParam")
    public String getParam(String param){
        System.out.println("请求参数param = " + param);
        return "success";
    }
REST式请求风格
- REST:即Representational State Transfer:(资源)表现层状态转化
GET:用来获取资源POST:用来新建资源PUT:用来更新资源DELETE:用来删除资源
REST的核心过滤器
- 当前的浏览器只支持post/get请求,因此为了得到put/delete的请求方式需要使用Spring提供的
HiddenHttpMethodFilter过滤器进行转换 HiddenHttpMethodFilter只能对post请求进行转换- 需要在web.xml配置文件中配置
Rest风格请求快速入门
- 在web.xml配置文件,添加一个HiddenHttpFilter过滤器
- 配置所有请求都需要经过该过滤器
<!--filter过滤器配置-->
    <!--配置hiddenHttpMethodFilter过滤器,用于实现对于rest风格请求的转换-->
    <filter>
        <filter-name>hiddenHttpMethodFilter</filter-name>
        <filter-class>org.springframework.web.filter.HiddenHttpMethodFilter</filter-class>
    </filter>
    <filter-mapping>
        <filter-name>hiddenHttpMethodFilter</filter-name>
        <!--配置所有请求都需要经过该过滤器-->
        <url-pattern>/*</url-pattern>
    </filter-mapping>
- ioc容器配置文件添加两个常规配置
	<!--加入两个常规配置-->
    <!--default-servlet-handler配置将不能处理的请求交给tomcat处理,例如请求css-->
    <mvc:default-servlet-handler/>
    <!--加入支持SpringMVC的高级功能,例如JRS303校验,映射动态请求-->
    <mvc:annotation-driven/>
- 测试的jsp文件
- 超链接默认是get请求,需要给超链接绑定一个点击事件,将点击超链接转换为提交表单,发起post请求
- 在表单中设置
_method属性设置请求的类型是post请求或delete请求或put请求
<%--
  Created by IntelliJ IDEA.
  User: 杨逸
  Date: 2023/9/7
  Time: 20:21
  Version: 1.0
--%>
<%@ page contentType="text/html;charset=UTF-8" language="java" %>
<html>
<%--添加jquery--%>
<script type="text/javascript" src="script/jquery-3.6.0.min.js"></script>
<script type="text/javascript">
    $(function (){
        // 给删除书本的超链接绑定一个点击事件
        $("#deleteBook").click(function (){
            // 将超链接的url设置为表单的url
            let $hiddenForm = $("#hiddenForm");
            $hiddenForm.attr("action",this.href);
            // 将隐藏表单的"_method"控件的值设置为delete
            $("#deleteMethod").val("DELETE");
            console.log(this.href);
            // 提交表单
            $hiddenForm.submit();
            // 阻止超链接跳转

            return false;
        })
    })
</script>
<head>
    <title>测试Rest风格的请求</title>
</head>
<body>
<h1>测试REST风格的请求</h1>

<hr>
<h2>get请求,查询一本书</h2>
<form action="book/get" method="get">
    bookId:<input type="text" name="id">
    <input type="submit" value="查询">
</form>

<hr>
<h2>post请求,添加一本书</h2>
<form action="book/post" method="post">
    bookName:<input type="text" name="name"/>
    <input type="submit" value="添加">
</form>

<hr>
<h2>删除一本书</h2>
<%--给超链接绑定一个点击事件,提交一个表单,改变请求方式为post--%>
<a href="book/delete/600" id="deleteBook">删除指定id的书</a>
<form action="" id="hiddenForm" method="post">
    <%--给隐藏的表单空间设置name为"_method",后台hiddenHttpFilter过滤器通过该属性识别请求方法--%>
    <input type="hidden" name="_method" id="deleteMethod">
</form>

<hr>
<h2>修改一本书</h2>
<form action="book/put" method="post">
    <%--<input type="hidden" name="_method" value="PUT">--%>
    <input type="hidden" name="_method" value="PUT">
    bookId:<input type="text" name="id">
    bookName:<input type="text" name="name">
    <input type="submit" value="修改">
</form>


</body>
</html>
- Handler文件
- 因为jsp只能处理get和post请求,所以处理完成后需要重定向到成功页面,否则会报错
- 使用
redirect:/pages/success进行重定向
package com.hsp.web.rest;

import org.springframework.stereotype.Controller;
import org.springframework.web.bind.annotation.*;

/**
 * @Projectname: SpringMVC
 * @Filename: BookHandler
 * @Author: 杨逸
 * @Data:2023/9/7 20:28
 * @Description: 演示Rest请求风格的类
 */
@RequestMapping("")
@Controller
public class BookHandler {

    /**
     * get请求获取书本信息
     * @param id
     * @return
     */
    @GetMapping("/book/get")
    public String getBook(String id){
        System.out.println("查询书本的id = " + id);
        return "success";
    }

    /**
     * post请求添加书本
     * @param name
     * @return
     */
    @PostMapping("/book/post")
    public String addBook(String name){
        System.out.println("添加书本的名称name = " + name);
        return "success";
    }

    /**
     * delete请求删除书本,
     * 因为jsp只能处理get和post请求,所以处理完成后需要重定向到成功页面,否则会报错
     * @param id
     * @return
     */
    @DeleteMapping("/book/delete/{id}")
    public String deleteBook(@PathVariable(value = "id") String id){
        System.out.println("删除书本为id = " + id);
        return "redirect:/pages/success";
    }


    @PutMapping("/book/put")
    public String putBook(String name,String id){
        System.out.println("name = " + name);
        System.out.println("id = " + id);
        return "redirect:/pages/success";
    }

    /**
     * 处理重定向到success页面的请求,转发到success页面
     * @return
     */
    @RequestMapping("/pages/success")
    public String success(){
        return "success";
    }
}
获取请求中携带的参数信息
- 数据绑定流程图
使用@RequestParam注解获取请求中的参数
- 使用
@RequestParam注解通过value属性可以获取请求中指定的参数,并赋值给形参 - 通过
required属性可以设置该参数是否是必须的,默认为true,表示为必须的,如果没有该参数就会报错 - 通过
defaultValue属性可以设置参数的默认值,如果没有传参就使用默认值
 /**
     * 获取请求中的参数
     * @RequestParam (value = "userName",required = false)
     * 通过该注解获取请求中userName的参数,并赋值给形参
     * 通过required属性设置该参数不是必须的,默认是必须的
     * @param name 参数
     * @return
     */
    @RequestMapping(value = "/getParam")
    public String getParamByAnotherName(@RequestParam (value = "userName",required = false) String name){
        System.out.println("参数中的name = " + name);
        return "success";
    }
将请求中的参数封装为bean
- 在形参中传入一个请求参数封装后bean对象
- spring会自动将参数中与对象属性名称相同的参数自动注入bean中
- 这个bean也会被spring放入到request域中,是按照类名首字母小写的形式将该bean对象放入request域中
- 给联级属性赋值需使用 "属性.属性的方式",需要前端传参时配合,例如:"pet.name"
- 如果没有相同名称的参数,默认属性为null
/**
     * 在形参中传入一个请求参数封装后bean对象
     * spring会自动将参数中与对象属性名称相同的参数自动注入bean中
     * 给联级属性赋值需使用 "属性.属性的方式",需要前端传参时配合,例如:"pet.name"
     * 如果没有相同名称的参数,默认属性为null
     * @param monster 请求参数封装后的bean
     * @return
     */
    @RequestMapping(value = "/getParamForBean")
    public String getParamForBean(Monster monster){
        System.out.println("获取请求的参数封装为bean");
        System.out.println("monster = " + monster);
        return "success";
    }
- 前端提交的表单
- 传参时按联级属性的方式传参,例如:
name="pet.name"
<form action="vote/getParamForBean" method="post">
    主人名称:<input type="text" name="name"/>
    主人id:<input type="text" name="id"/>
    <%--传参时按联级属性的方式传参--%>
    宠物名称:<input type="text" name="pet.name"/>
    宠物id:<input type="text" name="pet.id"/>
    	<input type="submit" value="提交"/>
</form>
使用@RequestHeader注解获取请求头
- 通过该注解的
value属性指定获取请求头的字段,并赋值给形参
/**
     * 获取请求头的信息
     * @RequestHeader(value = "User-Agent")
     * 通过该注解的value属性指定获取请求头的字段,并赋值给形参
     *
     * @param userAgent
     * @param referer
     * @return
     */
    @RequestMapping(value = "/getRequestHeader")
    public String getRequestHeader(@RequestHeader(value = "User-Agent") String userAgent,@RequestHeader(value = "Referer") String referer){
        System.out.println("userAgent = " + userAgent);
        System.out.println("referer = " + referer);
        return "success";
    }
获取原生HttpServletRequest和HttpServletResponse
- 直接给方法的形参添加
HttpServletRequest和HttpServletResponse参数即可,spring会将它们作为参数传进来 - 获取其他原生web常用类也可以这样操作,比如获得HttpSession对象
 /**
     * 获取原生HttpServletRequest和HttpServletResponse
     * 直接给方法的形参添加HttpServletRequest和HttpServletResponse参数即可,
     * spring会将它们作为参数传进来
     * 获取其他原生web常用类也可以这样操作,比如获得HttpSession对象
     * @param httpServletRequest
     * @param httpServletResponse
     * @return
     */
    @RequestMapping(value = "/getHttpRequestServlet")
    public String getHttpRequestServlet(HttpServletRequest httpServletRequest, HttpServletResponse httpServletResponse, HttpSession session){
        System.out.println("获取原生HttpServletRequest和HttpServletResponse");
        //获取请求中的参数
        String userName = httpServletRequest.getParameter("userName");
        String id = httpServletRequest.getParameter("id");
        //获取session对象
        HttpSession session1 = httpServletRequest.getSession();
        System.out.println("session1 = " + session1);
        System.out.println("session = " + session);
        return "success";
    }
数据模型
将数据放入request域
通过HttpServletRequest将数据放入到request域中
- 通过HttpServletRequest添加request域的数据
- request域的数据是按照K-V的形式存储的
 /**
     * 通过HttpServletRequest给request域添加数据
     * @param monster
     * @param httpServletRequest
     * @return
     */
    @RequestMapping(value = "/setRequest1")
    public String setRequest1(Monster monster,HttpServletRequest httpServletRequest){
        System.out.println("方式一");
        //通过HttpServletRequest添加request域的数据
        //request域的数据是按照K-V的形式存储的
        httpServletRequest.setAttribute("address","广东");
        return "vote_ok";
    }
通过Map给request域添加数据
- 通过Map给request域添加数据
- 给map添加数据,最后spring会扫描将map中所有数据添加到request域中
 /**
     * 通过Map给request域添加数据
     * 可以添加request域已经存在的Key,旧的数据会被覆盖掉
     * @param monster
     * @param map
     * @return
     */
    @RequestMapping(value = "/setRequest2")
    public String setRequest2(Monster monster, Map<String,Object> map){
        System.out.println("方式二");
        //通过Map给request域添加数据
        //也可以添加request域已经存在的数据,但旧的数据会被覆盖掉
        map.put("address","北极");
        //给map添加数据,最后spring会扫描将map中所有数据添加到request域中
        return "vote_ok";
    }
通过ModelAndView对象给Request域设置数据
- 通过
addObject("address","上海")给request域添加数据 - 通过
setViewName("vote_ok")设置跳转视图的名称
 /**
     * 通过ModelAndView给Request域设置数据
     * 最后返回ModelAndView对象,之前返回字符串的方式,spring是自动封装为一个ModelAndView对象返回
     * @param monster
     * @return
     */
    @RequestMapping(value = "/setRequest3")
    public ModelAndView setRequest3(Monster monster){
        System.out.println("方式三");
        //通过modelAndView模型与视图对象给request域添加数据
        ModelAndView modelAndView = new ModelAndView();
        //添加数据
        modelAndView.addObject("address","上海");
        //通过名称指定视图,也可以创建一个视图再传进去
        modelAndView.setViewName("vote_ok");
        //最后返回modelAndView对象
        return modelAndView;
    }
将数据添加到Session域中
- 传入一个HttpSession对象,通过该对象给session域添加数据
 /**
     * 给session域添加数据
     * @param monster
     * @param session HttpSession对象
     * @return
     */
    @RequestMapping(value = "/setSession")
    public String setSession(Monster monster,HttpSession session){
        System.out.println("给session域添加数据");
        session.setAttribute("address","亚洲");
        return "vote_ok";
    }
@ModelAttrbute注解的使用
- 该注解使用在
Handler处理器类上的方法 - 当需要调用该处理器的方法时,会先调用被该注解标注的方法完成初始化工作
/**
     * 演示@ModelAttribute注解的使用
     * 使用该注解标注的方法,会在其他请求调用方法被调用前调用
     */
    @ModelAttribute
    public void modelAttribute(){
        System.out.println("调用Handler处理器的初始化方法modelAttribute()");
    }
@ResponseBody注解的作用
- 用于指定响应返回数据的格式,比如:HTML,JSON
@RequestMapping(value = "/getJson")
    @ResponseBody()
    public String getDataForJson(){
        System.out.println("演示@ResponseBody注解的使用");
        return "success";
    }
视图与视图解析器
自定义视图
-
自定义视图工作流程
- SpringMVC调用目标方法,返回自定义View在Ioc容器中的id
- SpringMVC调用BeanNameViewResolver解析视图:从Ioc容器中获取返回id值对应的bean,即自定义的View的对象
- SpringMVC调用自定义视图的renderMergedOutputModel方法渲染视图
- 如果在SpringMVC调用目标方法,返回自定义View在Ioc容器中的id,不存在,则仍然按照默认的视图处理器机制处理
-
自定义视图类
-
继承
AbstractView,实现renderMergedOutputModel()方法 -
并加入IOC容器中,这个类就可以当作视图使用了
package com.hsp.web.view;

import org.springframework.stereotype.Component;
import org.springframework.web.servlet.view.AbstractView;

import javax.servlet.http.HttpServletRequest;
import javax.servlet.http.HttpServletResponse;
import java.util.Map;

/**
 * @Projectname: SpringMVC
 * @Filename: MyView
 * @Author: 杨逸
 * @Data:2023/9/8 16:37
 * @Description: 自定义视图
 */
//继承AbstractView,并加入IOC容器中,这个类就可以当作视图使用了
//设置视图的名称为hspView
@Component(value = "hspView")
public class MyView extends AbstractView {
    @Override
    protected void renderMergedOutputModel(Map<String, Object> map, HttpServletRequest httpServletRequest, HttpServletResponse httpServletResponse) throws Exception {
        System.out.println("进入自定义视图");
        //完成视图的渲染
        //....

        //转发到测试页面
        httpServletRequest.getRequestDispatcher("/pages/my_view.jsp").forward(httpServletRequest,httpServletResponse);
    }
}
- 使用自定义视图的Handler处理器
package com.hsp.web.viewResolver;

import org.springframework.stereotype.Controller;
import org.springframework.web.bind.annotation.RequestMapping;

/**
 * @Projectname: SpringMVC
 * @Filename: GoodsHandler
 * @Author: 杨逸
 * @Data:2023/9/8 16:44
 * @Description: 使用自定义视图的Handler
 */
@RequestMapping(value = "/goods")
@Controller
public class GoodsHandler {
    @RequestMapping(value = "/buy")
    public String buy(){
        System.out.println("buy()方法被调用");
        //返回视图的名称
        return "hspView";
    }
}
- 在IOC容器配置中配置自定义视图的视图解析器
- 加入
BeanNameViewResolver视图解析器,并设置优先级高于默认视图解析器
<!--配置自定义视图解析器-->
    <bean class="org.springframework.web.servlet.view.BeanNameViewResolver" id="viewResolver">
        <!--配置自定义视图的优先级,默认为Integer.MAX_VALUE-->
        <!--数值越小优先级越高-->
        <property name="order" value="99"/>
    </bean>
使用forward关键字进行请求转发
/**
     * 测试forward关键字进行请求转发
     * @return
     */
    @RequestMapping("/forward")
    public String forward(){
        System.out.println("请求转发");
        //使用forward关键字进行请求转发
        return "forward:/pages/success.jsp";
    }
使用redirect关键字进行重定向
- 注意:重定向无法重定向到
/WEb-INF目录下
/**
     * 测试 redirect关键字进行重定向
     * 注意:重定向无法重定向到/WEb-INF目录下
     * @return
     */
    @RequestMapping(value = "/redirect")
    public String redirect(){
        System.out.println("重定向");
        //使用redirect关键字进行重定向
        return "redirect:/pages/login_ok.jsp";
    }
数据格式化
- SpringMVC可以自动将字符串转换为基本数据类型,前提是可以转换
- 基本数据类型与字符串之间可以相互转换
特殊数据类型与字符串之间的转换
- 通过在bean类对应的字段上使用注解解决
@DateTimeFormat注解用于日期类型与字符串之间的转换@NumberFormat注解用于小数类型与字符串之间的转换- 使用注解演示特殊数据类型转换的bean
package com.hsp.web.datavalid.entity;

import org.springframework.format.annotation.DateTimeFormat;
import org.springframework.format.annotation.NumberFormat;

import java.util.Date;

/**
 * @Projectname: SpringMVC
 * @Filename: Monster
 * @Author: 杨逸
 * @Data:2023/9/10 21:34
 * @Description: 演示SpringMVC中基本数据类型与字符串之间转换的实体类
 */
public class Monster {
    private Integer id;
    private String name;
    private Integer age;
    private String email;
    //时间类型的转换,通过pattern指定时间的格式
    @DateTimeFormat(pattern = "yyyy-MM-dd")
    private Date birthday;
    //小数类型的转换
    @NumberFormat(pattern = "###,###.##")
    private Float salary;


    public Monster(Integer id, String name, Integer age, String email, Date birthday, Float salary) {
        this.id = id;
        this.name = name;
        this.age = age;
        this.email = email;
        this.birthday = birthday;
        this.salary = salary;
    }

    public Monster() {
    }

    public Integer getId() {
        return id;
    }

    public void setId(Integer id) {
        this.id = id;
    }

    public String getName() {
        return name;
    }

    public void setName(String name) {
        this.name = name;
    }

    public Integer getAge() {
        return age;
    }

    public void setAge(Integer age) {
        this.age = age;
    }

    public String getEmail() {
        return email;
    }

    public void setEmail(String email) {
        this.email = email;
    }

    public Date getBirthday() {
        return birthday;
    }

    public void setBirthday(Date birthday) {
        this.birthday = birthday;
    }

    public Float getSalary() {
        return salary;
    }

    public void setSalary(Float salary) {
        this.salary = salary;
    }

    @Override
    public String toString() {
        return "Monster{" +
                "id=" + id +
                ", name='" + name + '\'' +
                ", age=" + age +
                ", email='" + email + '\'' +
                ", birthday=" + birthday +
                ", salary=" + salary +
                '}';
    }
}
- 演示的controller
package com.hsp.web.datavalid;

import com.hsp.web.datavalid.entity.Monster;
import org.springframework.stereotype.Controller;
import org.springframework.web.bind.annotation.RequestMapping;

import javax.servlet.http.HttpServletRequest;

/**
 * @Projectname: SpringMVC
 * @Filename: MonsterController
 * @Author: 杨逸
 * @Data:2023/9/11 8:45
 * @Description: 演示数据绑定的使用
 */
@Controller
public class MonsterController {
    @RequestMapping(value = "/addMonster")
    public String addMonster(HttpServletRequest request){
        //使用SpringMVC的form表单标签,在页面显示前,request域需要有一个bean
        request.setAttribute("monster",new Monster());
        return "datavalid/monster_addUI";
    }

    @RequestMapping(value = "/add")
    public String add(Monster monster){
        System.out.println("演示数据类型的自动转换");
        System.out.println("接受到的数据monster = " + monster);
        return "success";
    }
}
- 演示的jsp页面
<%--
  Created by IntelliJ IDEA.
  User: 杨逸
  Date: 2023/9/10
  Time: 21:38
  Version: 1.0
--%>
<%--引入SpringMVC提供的标签--%>
<%@ taglib prefix="form" uri="http://www.springframework.org/tags/form" %>

<%@ page contentType="text/html;charset=UTF-8" language="java" %>
<html>
<head>
    <title>添加妖怪</title>
    <h1>添加妖怪</h1>
<hr>
    <%--1.SpringMVC表单标签在显示之前必须在request中有一个bean,该bean的属性和表单标签的字段要对应
request中的key为:form标的modelAttrite属性值,比如这里的monsters
2.SpringMVC的form:form标签的action属性值中的/不代表WEB应用的根目录.--%>
    <form:form modelAttribute="monster" action="add" method="post">
        <%--modelAttribute表示request域要存在一个bean,且名称为monster,这个属性是必须有的--%>
        <%--path的配置要与bean的属性名称保持一致,否则取不到数据--%>
        妖怪名称:<form:input path="name"></form:input><br>
        妖怪id:<form:input path="id"></form:input><br>
        年龄:<form:input path="age"></form:input><br>
        邮件:<form:input path="email"></form:input><br>
        生日:<form:input path="birthday"></form:input><br>
        工资:<form:input path="salary"></form:input><br>
            <input type="submit" value="添加"/>
    </form:form>
</head>
<body>

</body>
</html>
数据校验
-
使用
JSR303校验框架和Hibernate Validator校验框架进行校验 -
使用检验注解,需要在响应方法的参数上使用指定
@Valid注解标注需要校验的形参 -
JSR常用注解的含义@Null:被注释的元素必须为nu1I@NotNull:被注释的元素必须不为null@AssertTrue:被注释的元素必须为true@AssertFalse:被注释的元素必须为false@Min (value):被注释的元素必须是一个数字,其值必须大于等于指定的最小值@Max (value):被注释的元素必须是个数字,其值必须小于等于指定的最大值@DecimalMin(value):被注释的元素必须是一个数字,其值必须大于等于指定的最小值@DecimalMax (value):被注释的元素必须是个数字,其值必须小于等于指定的最大值@Size (max,min):被注释的元素的大小必须在指定的范围内@Digits (integer,fraction):被注释的元素必须是一个数字,其值必须在可接受的范围内@Past:被注释的完素必须是一个过去的日期@Future:被注释的元素必须是一个将来的日明@Pattern(value):被注释的元素必须符合指定的正则表达式
-
Hibernate Validator常用的注解@Email:被注释的元素必须是电子邮箱地址@Length:被注释的字符串的大小必须在指定的范围内@NotEmpty:被注释的字符串的必须非空@Range:被注释的元素必须在合适的范围内
快速入门
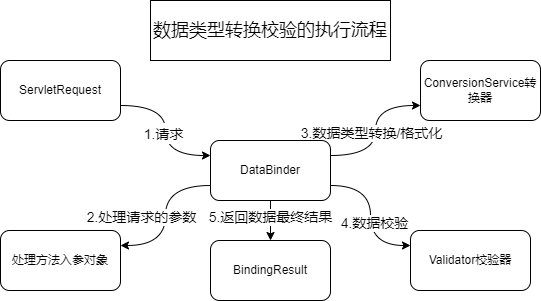
- 使用校验注解的bean
package com.hsp.web.datavalid.entity;

import org.hibernate.validator.constraints.Email;
import org.hibernate.validator.constraints.NotEmpty;
import org.hibernate.validator.constraints.Range;
import org.springframework.format.annotation.DateTimeFormat;
import org.springframework.format.annotation.NumberFormat;

import javax.validation.constraints.NotNull;
import java.util.Date;

/**
 * @Projectname: SpringMVC
 * @Filename: Monster
 * @Author: 杨逸
 * @Data:2023/9/10 21:34
 * @Description: 演示SpringMVC中基本数据类型与字符串之间转换的实体类
 */
public class Monster {
    //@NotNull校验数据不能为null,通过message设置校验失败后回显的信息
    @NotNull(message = "id不能为空")
    private Integer id;
    //@NotEmpty校验字符串,Collection类型不能为空
    @NotEmpty
    private String name;
    //使用@Range注解校验数据范围,通过min和max属性设置校验的范围,min默认0,max默认Interger.MAX_VALURE
    //校验注解可以组合使用
    @NotNull(message = "年龄不能为空")
    @Range(min = 1,max = 100)
    private Integer age;
    //校验是否为邮件
    @Email(message = "邮件格式不正确")
    @NotEmpty(message = "邮件不能为空")
    private String email;
    //时间类型的转换,通过pattern指定时间的格式
    @DateTimeFormat(pattern = "yyyy-MM-dd")
    private Date birthday;
    //小数类型的转换
    @NumberFormat(pattern = "###,###.##")
    private Float salary;


    public Monster(Integer id, String name, Integer age, String email, Date birthday, Float salary) {
        this.id = id;
        this.name = name;
        this.age = age;
        this.email = email;
        this.birthday = birthday;
        this.salary = salary;
    }

    public Monster() {
    }

    public Integer getId() {
        return id;
    }

    public void setId(Integer id) {
        this.id = id;
    }

    public String getName() {
        return name;
    }

    public void setName(String name) {
        this.name = name;
    }

    public Integer getAge() {
        return age;
    }

    public void setAge(Integer age) {
        this.age = age;
    }

    public String getEmail() {
        return email;
    }

    public void setEmail(String email) {
        this.email = email;
    }

    public Date getBirthday() {
        return birthday;
    }

    public void setBirthday(Date birthday) {
        this.birthday = birthday;
    }

    public Float getSalary() {
        return salary;
    }

    public void setSalary(Float salary) {
        this.salary = salary;
    }

    @Override
    public String toString() {
        return "Monster{" +
                "id=" + id +
                ", name='" + name + '\'' +
                ", age=" + age +
                ", email='" + email + '\'' +
                ", birthday=" + birthday +
                ", salary=" + salary +
                '}';
    }
}
- 响应方法设置设置需要校验的参数
- 使用
@Valid注解标注需要进行校验的参数
/**
     * 使用@Valid注解标注需要进行校验的参数
     * @param monster 使用@Valid注解校验的参数
     *  下面两个参数是需要进行校验时常带的参数
     * @param errors 保存校验发生错误的信息
     * @param map 校验过程中发生的错误信息会保存到该Map
     * @return
     */
    @RequestMapping(value = "/save")
    public String save(@Valid Monster monster, Errors errors, Map<String,Object> map){
        System.out.println("响应数据校验的方法");
        System.out.println("monster = " + monster);
        System.out.println("========map=====");
        Set<Map.Entry<String, Object>> entrySet = map.entrySet();
        for (Map.Entry<String, Object> entry : entrySet) {
            System.out.println("entry.getKey() = " + entry.getKey());
            System.out.println("entry.getValue() = " + entry.getValue());
        }
        System.out.println("======error====");
        if (errors.hasErrors()){
            //发生校验错误
            List<ObjectError> allErrors = errors.getAllErrors();
            for (ObjectError error : allErrors) {
                System.out.println(error);
            }
            //返回原页面
            return "datavalid/monster_addUI";
        }


        return "success";
    }
- 演示使用的jsp页面
- SpringMVC错误信息回显使用的标签
<form:errors path="name"/></font>,path属性用于指定用于显示哪个字段错误的信息
<%--
  Created by IntelliJ IDEA.
  User: 杨逸
  Date: 2023/9/10
  Time: 21:38
  Version: 1.0
--%>
<%--引入SpringMVC提供的标签--%>
<%@ taglib prefix="form" uri="http://www.springframework.org/tags/form" %>

<%@ page contentType="text/html;charset=UTF-8" language="java" %>
<html>
<head>
    <title>添加妖怪</title>
    <h1>添加妖怪</h1>
<hr>
    <%--1.SpringMVC表单标签在显示之前必须在request中有一个bean,该bean的属性和表单标签的字段要对应
request中的key为:form标的modelAttrite属性值,比如这里的monsters
2.SpringMVC的form:form标签的action属性值中的/不代表WEB应用的根目录.--%>
    <form:form modelAttribute="monster" action="save" method="post">
        <%--modelAttribute表示request域要存在一个bean,且名称为monster,这个属性是必须有的--%>
        <%--path的配置要与bean的属性名称保持一致,否则取不到数据--%>
<%--        <form:errors/>标签是用于显示错误信息的回显--%>
        妖怪名称:<form:input path="name"></form:input><form:errors path="name"/><br>
        妖怪id:<form:input path="id"></form:input><form:errors path="id"/><br>
        年龄:<form:input path="age"></form:input><form:errors path="age"/><br>
        邮件:<form:input path="email"></form:input><form:errors path="email"/><br>
        生日:<form:input path="birthday"></form:input><form:errors path="birthday"/><br>
        工资:<form:input path="salary"></form:input><form:errors path="salary"/><br>
            <input type="submit" value="添加"/>
    </form:form>
</head>
<body>

</body>
</html>
国际化资源
- 添加解析国际化的bean
<!--配置国际化错误信息的资源处理bean-->
    <bean class="org.springframework.context.support.ResourceBundleMessageSource" id="bundleMessageSource">
        <!--配置国际化文件名称-->
        <property name="basename" value="i18n"/>
    </bean>
- 国际化配置文件
- 配置格式:
校验规则.modelAttribute属性值.属性名
NotEmpty.monster.name=\u7528\u6237\u540d\u4e0d\u80fd\u4e3a\u7a7a
typeMismatch.monster.age=\u5e74\u9f84\u8981\u6c42\u5728\u0031\u002d\u0031\u0035\u0030\u4e4b\u95f4
typeMismatch.monster.birthday=\u751f\u65e5\u683c\u5f0f\u4e0d\u6b63\u786e
typeMismatch.monster.salary=\u85aa\u6c34\u683c\u5f0f\u4e0d\u6b63\u786e
取消属性与对象之间的绑定
- 使用
@InitBinder注解取消属性绑定,该注解标注的方法可以对WebDataBinder对象进行初始化 - 该注解标注的方法不能有返回值,返回类型必须为
void,形参通常有一个WebDataBinder对象 - 如果取消了某个属性的绑定,应该取消对该属性的验证注解
 /**
     * 使用@InitBinder注解取消属性monster的name属性的绑定
     * SpringMVC进行数据绑定时会调用WebDataBinder的方法进行绑定初始化
     * @param webDataBinder
     */
    @InitBinder
    public void initBinder(WebDataBinder webDataBinder){
        //取消monster的name属性的绑定,该方法接受可变参数,可传入多个参数
        webDataBinder.setDisallowedFields("name");
    }
解决中文乱码问题
自定义过滤器解决中文乱码问题
- 在过滤器中将编码设置为utf-8
- 使用
filterChain.doFilter()调用过滤器,只调用一次,非链式调用
package com.hsp.web.filter;

import javax.servlet.*;
import java.io.IOException;

/**
 * @Projectname: SpringMVC
 * @Filename: MyCharacterFilter
 * @Author: 杨逸
 * @Data:2023/9/11 15:59
 * @Description: 处理中文乱码问题的过滤器
 */
public class MyCharacterFilter implements Filter {
    @Override
    public void init(FilterConfig filterConfig) throws ServletException {
        System.out.println("处理中文乱码问题的过滤器初始化");
    }

    @Override
    public void doFilter(ServletRequest servletRequest, ServletResponse servletResponse, FilterChain filterChain) throws IOException, ServletException {
        //设置编码
        servletRequest.setCharacterEncoding("utf-8");
        //这样是链式调用
        //doFilter(servletRequest, servletResponse, filterChain);

        //这样是只调用一次过滤器,后面还有匹配的过滤器都不执行
        filterChain.doFilter(servletRequest, servletResponse);
    }

    @Override
    public void destroy() {

    }
}
web.xml配置
处理中文乱码的过滤器
    <filter>
        <filter-name>myCharacterFilter</filter-name>
        <filter-class>com.hsp.web.filter.MyCharacterFilter</filter-class>
    </filter>
    <!--对所有请求生效-->
    <filter-mapping>
        <filter-name>myCharacterFilter</filter-name>
        <url-pattern>/*</url-pattern>
    </filter-mapping>
使用SpringMVC提供的过滤器解决中文乱码问题
- 只需配置一下即可
- 配置过滤器的
encoding属性设置编码
<!--使用SpringMVC的过滤器解决中文乱码问题-->
        <filter>
            <filter-name>characterEncodingFilter</filter-name>
            <filter-class>org.springframework.web.filter.CharacterEncodingFilter</filter-class>
            <!--配置编码-->
            <init-param>
                <param-name>encoding</param-name>
                <param-value>utf-8</param-value>
            </init-param>
        </filter>
    <filter-mapping>
        <filter-name>characterEncodingFilter</filter-name>
        <url-pattern>/*</url-pattern>
    </filter-mapping>
处理JSON和HttpMessageConverter

@RequestBody注解的使用
- 被该注解标注的形参,会将请求的json格式数据封装为一个javabean然后入参
 /**
     * 将请求json数据转换为bean
     * 使用@RequestBody注解标注需要转换为bean的请求中json数据
     * @param user 请求中的json数据转换后的bean
     * @return
     */
    @RequestMapping(value = "/json/send")
    @ResponseBody
    public User sendJson(@RequestBody User user){
        System.out.println("user = " + user);
        return user;
    }
@ResponseBody注解的使用
- 被该注解标注的方法返回的是json格式的数据
- 该注解既可以使用在方法上,也可以使用在类上,使用在类上时表示该类的所有方法都是返回json格式的数据
@ResponseBody与@Controller注解组合使用在类上,可以使用RestController注解代替,进行简写
/**
     * 返回json格式的数据
     * SpringMVC会根据 @ResponseBody 注解返回json格式的数据
     * @return
     */
    @RequestMapping(value = "/json/dog")
    @ResponseBody
    public Dog getJson(){
        //返回对象
        //SpringMVC会将数据解析为json格式,再返回
        Dog dog = new Dog();
        dog.setName("大黄");
        dog.setAddress("背景");
        return dog;
    }

    /**
     * 获取List类型的json数据
     * @return
     */
    @RequestMapping(value = "/json/getDogs")
    @ResponseBody
    public List<Dog> getDogs(){
        ArrayList<Dog> dogs = new ArrayList<>();
        dogs.add(new Dog("yy","上海"));
        dogs.add(new Dog("kk","工作"));
        dogs.add(new Dog("jj","设置"));
        return dogs;
    }
- 演示的jsp页面
- 使用jquery发起ajax请求,进行演示
<%--
  Created by IntelliJ IDEA.
  User: 杨逸
  Date: 2023/9/11
  Time: 16:40
  Version: 1.0
--%>
<%@ page contentType="text/html;charset=UTF-8" language="java" %>
<html>
<head>
    <title>请求json数据</title>
    <script type="text/javascript" src="script/jquery-3.6.0.min.js"></script>
    <script type="text/javascript">
        $(function (){
            $("#getJson").click(function (){
                //获取的请求的url
                var href = this.href;
                //设置时间参数
                var args = {"time":new Date()};
                $.post(
                    // 请求的url
                    href,
                    // 请求携带的参数
                    args,
                    function (data){
                        console.log(data);
                    },
                    "json"
                );
                return false;
            })
            $("input[type='button']").click(function () {
                var url = "json/send";
                // 获取表达中的数据
                var name = $("input[name='userName']").val();
                var age = $("input[name='age']").val();
                //将数据封装为一个对象
                var user = {"userName":name,"age":age};
                //使用内置JSON对象,将对象转换为json字符串
                var arg = JSON.stringify(user);
                console.log("准备发起ajax请求",arg);
                // 发起ajax请求
                $.ajax({
                    url:url,
                    data:arg,
                    type:"post",
                    success:function (data){
                        console.log(data);
                    },
                    // 指定发送数据的类型
                    contentType:"application/json;charset=utf-8"
                });
            })
        })
    </script>
</head>
<body>
<h1>请求一个json格式数据</h1>
<%--使用jquery发情ajax请求--%>

<a href="<%=request.getContextPath()%>/json/dog" id="getJson">获取json数据</a>

<hr>
<h2>发送一个json数据</h2>
<form>
用户名:<input name="userName" type="text">
    年龄:<input name="age" type="text">
    <input value="发送json数据" type="button">
</form>
</body>
</html>
SpringMVC实现文件下载
- 通过返回
ResoponseEntity对象,下载文件
/**
     * 文件下载
     * @param session
     * @return
     */
    @RequestMapping(value = "/downFile")
    public ResponseEntity<byte[]> downFile(HttpSession session){
        System.out.println("下载文件");
        //构建一个ResponseEntity对象返回即可实现下载文件
        //public ResponseEntity(@Nullable T body, @Nullable MultiValueMap<String, String> headers, HttpStatus status)
        //构建该对象需要数据,响应头,响应状态

        //获取响应状态
        HttpStatus status = HttpStatus.OK;

        //获得用于下载的数据
        InputStream resourceAsStream = session.getServletContext().getResourceAsStream("/imgs/class1.png");
        //创建一个保存二进制数据的字节数组
        byte[] bytes = null;
        try {
            bytes = new byte[resourceAsStream.available()];
            //将二进制数据写入字节数组
            resourceAsStream.read(bytes);
        } catch (IOException e) {
            e.printStackTrace();
        }
        //获取响应头
        HttpHeaders httpHeaders = new HttpHeaders();
        //添加一个响应头,指定浏览器响应的方式为下载
        httpHeaders.add("Content-Disposition","attachment;filename=class1.png");

        ResponseEntity<byte[]> responseEntity = new ResponseEntity<>(bytes, httpHeaders, status);
        return responseEntity;
    }
SpringMVC实现文件上传
- 文件上传的Controller
package com.hsp.web.fileupload;

import org.springframework.stereotype.Controller;
import org.springframework.web.bind.annotation.RequestMapping;
import org.springframework.web.bind.annotation.RequestParam;
import org.springframework.web.multipart.MultipartFile;

import javax.servlet.http.HttpServletRequest;
import java.io.File;
import java.io.IOException;

/**
 * @Projectname: SpringMVC
 * @Filename: FileUploadHandler
 * @Author: 杨逸
 * @Data:2023/9/12 17:15
 * @Description: 文件上传的处理器
 */
@Controller
public class FileUploadHandler {
    @RequestMapping(value = "/fileUpLoad")
    public String fileUpLoad(@RequestParam(value = "file") MultipartFile file, HttpServletRequest request){
        System.out.println("上传文件");
        //获取提交的文件名
        String originalFilename = file.getOriginalFilename();

        //得到保存文件的路径
        String path = request.getServletContext().getRealPath("/imgs/" + originalFilename);

        System.out.println("path = " + path);
        //在保存文件的位置创建一个文件对象
        File saveToFile = new File(path);

        //将上传的文件写入保存的文件
        try {
            file.transferTo(saveToFile);
        } catch (IOException e) {
            e.printStackTrace();
        }
        return "success";
    }
}
- 配置处理文件上传的
CommonsMultipartResolver解析器bean - id需要设置为multipartResolver,底层是按照id进行装配
<!--配置文件上传需要的bean-->
    <!--id需要设置为multipartResolver,底层是按照id进行装配-->
    <bean class="org.springframework.web.multipart.commons.CommonsMultipartResolver" id="multipartResolver">

    </bean>
- jsp页面
- 传输二进制数据需要使用multipart/form-data的表单类型
<%--
  Created by IntelliJ IDEA.
  User: 杨逸
  Date: 2023/9/12
  Time: 17:08
  Version: 1.0
--%>
<%@ page contentType="text/html;charset=UTF-8" language="java" %>
<html>
<head>
    <title>文件上传</title>
</head>
<body>
<h1>文件上传</h1>
<%--传输二进制数据需要使用multipart/form-data类型--%>
<form action="fileUpLoad" method="post" enctype="multipart/form-data">
    文件介绍:<input type="text" name="introduce">
    选择文件:<input type="file" name="file">
    <input type="submit" value="提交">
</form>
</body>
</html>
拦截器
- 拦截器的执行流程
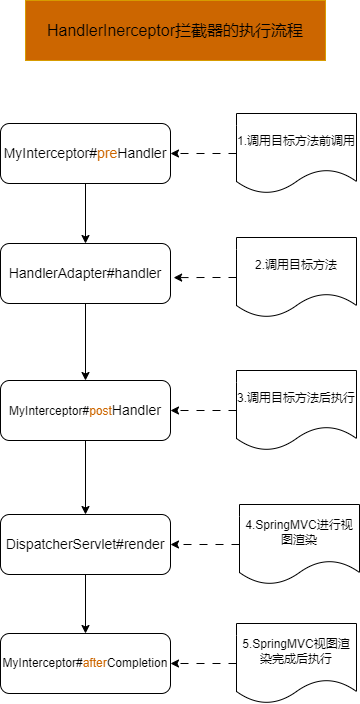
快速入门
- 自定义拦截器
- 实现
HandlerInterceptor接口,重写接口中的三个方法
package com.hsp.web.interceptor;

import org.springframework.stereotype.Component;
import org.springframework.web.servlet.HandlerInterceptor;
import org.springframework.web.servlet.ModelAndView;

import javax.servlet.http.HttpServletRequest;
import javax.servlet.http.HttpServletResponse;

/**
 * @Projectname: SpringMVC
 * @Filename: MyIntercetor01
 * @Author: 杨逸
 * @Data:2023/9/13 9:04
 * @Description: 演示拦截器的使用
 */
@Component
public class MyInterceptor01  implements HandlerInterceptor {
    @Override
    public boolean preHandle(HttpServletRequest request, HttpServletResponse response, Object handler) throws Exception {
        System.out.println("MyInterceptor01的preHandle()方法被调用");
        String keyword = request.getParameter("keyword");
        if ("病毒".equals(keyword)){
            //提交的参数为 病毒,则转发到警告页面,不执行后续的目标方法
            request.getRequestDispatcher("/pages/warring.jsp").forward(request,response);
            return false;
        }
        //这里如果返回false,则不执行后续的Handler目标方法以及postHandler()方法,直接执行afterCompletion()方法
        return true;
    }

    @Override
    public void postHandle(HttpServletRequest request, HttpServletResponse response, Object handler, ModelAndView modelAndView) throws Exception {
        System.out.println("MyInterceptor01的postHandle()方法被调用");
    }

    @Override
    public void afterCompletion(HttpServletRequest request, HttpServletResponse response, Object handler, Exception ex) throws Exception {
        System.out.println("MyInterceptor01的afterCompletion()方法被调用");
    }
}
- 测试拦截器的Handler
package com.hsp.web.interceptor;

import org.springframework.stereotype.Controller;
import org.springframework.web.bind.annotation.RequestMapping;

/**
 * @Projectname: SpringMVC
 * @Filename: FurnHandler
 * @Author: 杨逸
 * @Data:2023/9/13 9:36
 * @Description: 测试拦截器的使用
 */
@Controller
public class FurnHandler {
    @RequestMapping(value = "/hi")
    public String hi(){
        System.out.println("hi()方法被调用");
        return "success";
    }

    @RequestMapping(value = "hello")
    public String hello(){
        System.out.println("hello()方法被调用");
        return "success";
    }

    @RequestMapping(value = "/ok")
    public String ok(){
        System.out.println("ok()方法被调用,不被拦截的接口");
        return "success";
    }

}
- 配置拦截器
- 配置拦截有多种方式
<ref bean="myInterceptor01"></ref>这样配置会对所有接口进行拦截<mvc:interceptor>使用这个标签进行配置,可以指定拦截的接口,以及不拦截的接口,支持通配符的配置
<!--配置SpringMVC的拦截器-->
    <!--当配置多个拦截器,先配置的先执行,执行的流程与filter过滤器的链式调用形式类似-->
    <mvc:interceptors>
        <!--配置拦截器的第一种方式,这样配置会拦截所有的请求-->
        <!--<ref bean="myInterceptor01"></ref>-->

        <!--第二种配置方式,可以指定对哪个接口进行拦截-->
        <mvc:interceptor>
            <!--指定拦截的接口,支持通配符-->
            <mvc:mapping path="/h*"/>
            <!--指定不拦截的接口-->
            <mvc:exclude-mapping path="hi"/>
            <ref bean="myInterceptor01"/>
        </mvc:interceptor>
    </mvc:interceptors>
- 测试接口的页面
<%--
  Created by IntelliJ IDEA.
  User: 杨逸
  Date: 2023/9/13
  Time: 9:22
  Version: 1.0
--%>
<%@ page contentType="text/html;charset=UTF-8" language="java" %>
<html>
<head>
    <title>拦截器的使用</title>
</head>
<body>
<h1>演示拦截器的使用</h1>
<a href="hello?keyword=病毒">请求hello接口</a>
<a href="hi">请求hi接口</a>
<a href="ok">请求ok接口</a>
</body>
</html>
SpringMVC的异常处理
- 异常处理的优先级
局部异常处理 > 全局异常处理 > 统一异常处理 > Tomcat默认机制
局部异常处理
- 处理局部异常的方法,只能处理本类接口方法发生的异常,优先级高于全局异常
- 使用
@ExceptionHandler注解标注,表示这是一个处理局部异常的方法,通过value属性指定处理的异常种类 - 如果发生的异常不能匹配@ExceptionHandler注解的value中的值,则将异常交给全局异常处理类处理
/**
     * 处理局部异常的方法,只能处理本类接口方法发生的异常,优先级高于全局异常
     *
     * 使用@ExceptionHandler注解标注,表示这是一个处理局部异常的方法,通过value属性指定处理的异常种类
     * 如果发生的异常不能匹配@ExceptionHandler注解的value中的值,则将异常交给全局异常处理类处理
     * @param ex 发生的异常
     * @param request
     */
    @ExceptionHandler(value = {ArithmeticException.class})
    public String localException(Exception ex, HttpServletRequest request){
        System.out.println("局部异常处理");
        System.out.println("ex.getMessage() = " + ex.getMessage());
        request.setAttribute("reason",ex);
        return "exception";
    }
全局异常处理
- 使用
@ControllerAdvice注解标注的类为全局异常处理类 - 使用
@ExceptionHandler注解指定该方法处理的异常类型,与局部异常处理机制类似 - 可以指定一个方法对多中异常类型进行处理
package com.hsp.web.exception;

import org.springframework.web.bind.annotation.ControllerAdvice;
import org.springframework.web.bind.annotation.ExceptionHandler;

import javax.servlet.http.HttpServletRequest;

/**
 * @Projectname: SpringMVC
 * @Filename: GlobalExceptionHandler
 * @Author: 杨逸
 * @Data:2023/9/13 11:10
 * @Description: 演示全局异常处理的handler
 *  使用@ControllerAdvice注解标注的类为全局异常处理类
 */
@ControllerAdvice
public class GlobalExceptionHandler {
    /**
     *
     * 使用@ExceptionHandler注解指定该方法处理的异常类型
     * 可以指定一个方法对多中异常类型进行处理
     * 全局异常处理优先级高于统一异常处理器
     * @param ex
     * @param request
     * @return
     */
    @ExceptionHandler(value = {NumberFormatException.class,ClassCastException.class,AgeException.class})
    public String testGlobalException(Exception ex, HttpServletRequest request){
        System.out.println("全局异常处理");
        System.out.println("ex.getMessage() = " + ex.getMessage());
        request.setAttribute("reason",ex);
        return "exception";
    }
}
SpringMVC中的自定义异常
- 使用
@ResponseStatus注解标注这是一个SpringMVC自定义异常的方式 - 通过
reason属性设置发生异常的原因,通过value属性指定响应状态码
package com.hsp.web.exception;

import org.springframework.http.HttpStatus;
import org.springframework.web.bind.annotation.ResponseStatus;

/**
 * @Projectname: SpringMVC
 * @Filename: AgeException
 * @Author: 杨逸
 * @Data:2023/9/13 11:21
 * @Description: 在SpringMVC中的自定义异常
 * 使用@ResponseStatus注解标注这是一个SpringMVC自定义异常的方式
 * 通过reason属性设置发生异常的原因,通过value属性指定响应状态码
 */

@ResponseStatus(reason = "年龄不正确异常",value = HttpStatus.BAD_REQUEST)
public class AgeException extends RuntimeException{
    public AgeException(String message) {
        super(message);
    }

    public AgeException() {
    }
}
统一异常处理器SimpleMappingExceptionResolver
- 配置统一异常处理器
- prop标签的key属性设置处理异常的类型
- prop标签的内容表示对应的处理视图
 <!--配置统一异常处理器-->
    <bean class="org.springframework.web.servlet.handler.SimpleMappingExceptionResolver" id="exceptionResolver">
        <!--配置异常的映射-->
        <property name="exceptionMappings">
            <props>
                <!--配置异常对应的视图-->
                <!--key属性设置处理异常的类型,prop标签的内容表示对应的处理视图-->
                <prop key="java.lang.ArrayIndexOutOfBoundsException">error</prop>
                <!--将异常扩大,配置为未知异常的处理-->
                <prop key="java.lang.Exception">error</prop>
            </props>
        </property>
    </bean>
- 演示统一处理异常的接口
/**
     * 测试统一异常处理的接口
     * @return
     */
    @RequestMapping(value = "/testSimpleException")
    public String testSimpleException(){
        //模拟一个数组越界异常
        System.out.println("统一异常处理");
        int[] array = new int[0];
        int i = array[1];
        return "success";
    }